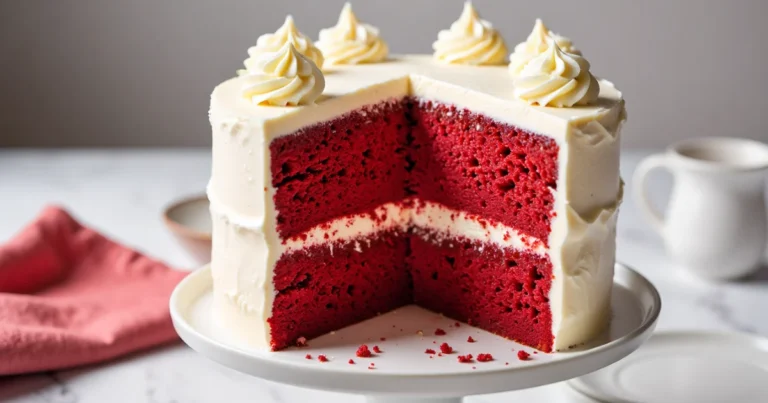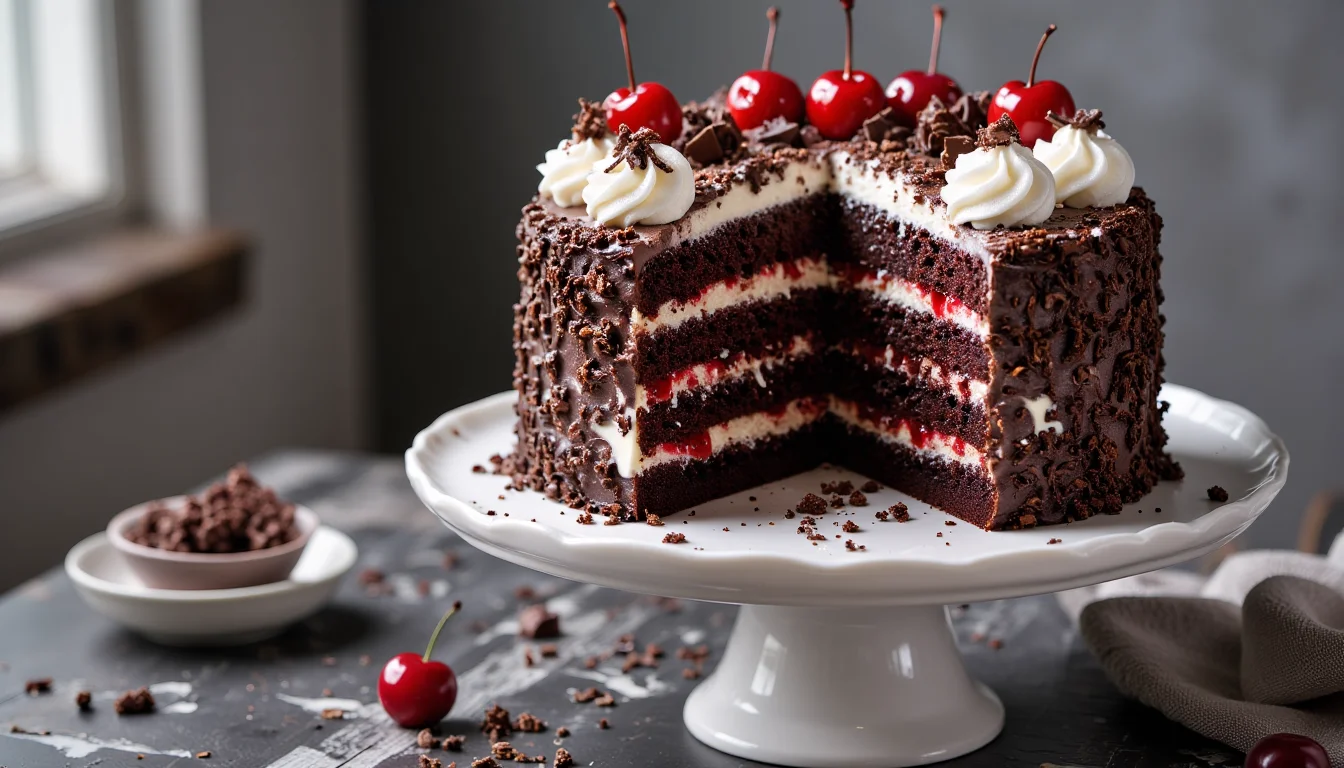
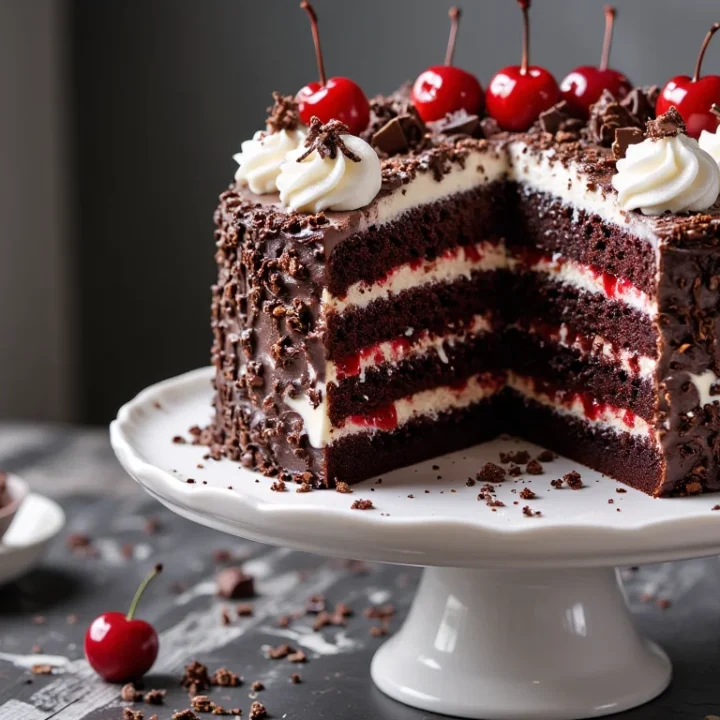
Authentic Black Forest Cake (Schwarzwälder Kirschtorte)
Why this Black Forest Cake works
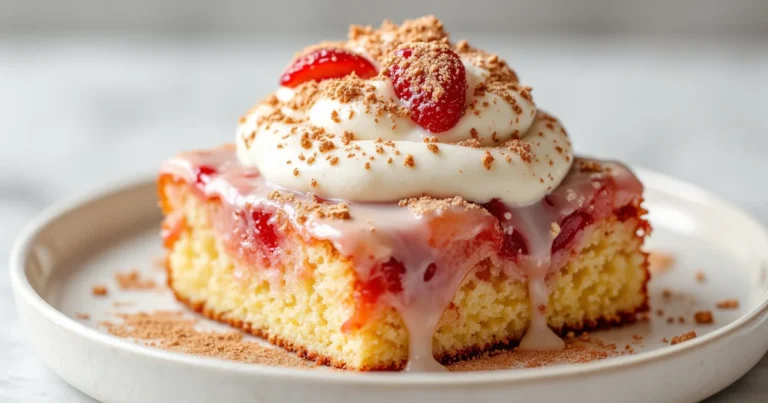
Saturday afternoon, rain on the windows, my sister texting photos of the sad grocery-store “chocolate cherry cake” she bought instead of making the real thing. You know the one: neon-red cherries, weirdly sweet cream, sponge so dry it squeaks. That was the day I decided we’re doing the classic at home, but in a way that actually fits a normal kitchen and a busy day.
Here’s the thing. A true Black Forest Cake isn’t just chocolate cake with cherries on top. It’s juicy, boozy (or not, your call) layers of dark cocoa sponge, brushed with cherry syrup so every bite is moist all the way through, then stacked with tart fruit and clouds of cream. Dramatic, but totally doable when you break it into parts.
This version leans hard into three big promises. First, the sponge: it uses both oil and melted butter, so you get that deep flavor without sacrificing moisture. The batter looks almost too thin. That’s exactly why it bakes up soft and tender instead of heavy. Second, the cherries: you get a built-in “cherry chart” so you can use fresh, frozen, or jarred and still end up with a thick, glossy filling that stays put instead of sliding out the sides. No sad purple puddle on your cake stand.
And then there’s the cream. We stabilize it just enough so it pipes beautifully and holds its shape for days, without turning into weird, stiff frosting. You’ll see little cues in the steps like “stop when it looks like shaving cream” so you know exactly when to put the mixer down.
To keep things calm, I walk you through a simple two-day plan: bake the layers and cook the cherry filling on Day 1, then assemble and decorate on Day 2 while the kids are doing homework or you’re waiting for the coffee to brew. The result is a tall, impressive German chocolate-and-cherry dessert that slices cleanly, tastes even better the next day, and doesn’t require a pastry-school degree.
Craving more tall, bakery-style cakes? Head over to The Ultimate Guide to Classic Layer Cakes for step-by-step stacking tips, crumb coat secrets, and seven must-bake classics.
What is authentic Black Forest cake?
Picture a little bakery somewhere in the Black Forest region of Germany, shelves full of tall chocolate-and-cherry tortes dusted with snow-white cream. That’s the origin story behind the dessert you and I know from birthdays and restaurant menus. At its core, an authentic version is three things working together: a light but sturdy chocolate sponge, tart cherries in their own syrup, and real whipped cream on the outside instead of buttercream. No shortcuts. No random “cherry-flavored” icing.
Traditional Schwarzwälder Kirschtorte is also all about contrast. Deep, slightly bitter cocoa up against bright, sour fruit. Just-sweet-enough cream softening everything. When those layers soak up cherry syrup, you get a cake that tastes rich but somehow not heavy. It’s more elegant than the supermarket version my neighbor showed up with once, where everything tasted like canned pie filling and sugar. Good intention, rough execution.
A quick history of Schwarzwälder Kirschtorte
The classic German torte is named after the Black Forest region and its famous sour cherries and cherry brandy. Bakers there used local ingredients: eggs for a light sponge, ground chocolate, and the strong clear cherry spirit they were already distilling. Over time, the combination of chocolate layers, Kirsch-soaked syrup, cherries, and whipped cream became the standard. If those four things are present, you’re in authentic territory.
Outside Germany, the idea got a little… wobbly. Some versions dropped the alcohol, some lost the real cherries and turned into plain chocolate gateau with red goo. In this recipe we circle back to the original structure but keep flexible options so you can decide how traditional you want to go.
The Kirsch factor (with and without alcohol)
Kirschwasser is a clear cherry brandy, not a sweet liqueur. It brings aroma more than intense booziness, especially when you mix it into syrup and drizzle it over the cake layers. Used lightly, it makes the chocolate taste deeper and the cherries smell like, well, cherries. Too much turns the whole dessert into a shot. Not ideal.
If you don’t want alcohol, you still get the same vibe. We’ll boost reserved cherry juice with a little sugar and a drop of almond extract, which mimics the subtle “cherry pit” flavor of Kirsch. Kids and non-drinkers can happily eat their slice, while anyone who loves the traditional version will still recognize the balance of cherry, chocolate, and cream. Everyone wins.
Ingredients & substitutions
When you skim the ingredient list the first time, it looks long. I know. But once you break it into four little “projects” in your head (cake, cherries, syrup, cream) it suddenly feels manageable. You probably own most of the pantry stuff already: flour, sugar, cocoa, oil, butter, vanilla. The main decisions you actually have to make are which cherries to buy, how chocolatey you want your sponge, and how sturdy you like your whipped cream.
The best cherries to use (fresh, frozen, jarred – cherry chart)
If you can get sour or Morello cherries, use them. They’re what gives that classic tangy bite instead of sugary jam vibes. My first try with sweet Bing cherries tasted fine but a little flat, like chocolate cake wearing a cherry costume.
Here’s the quick “cherry chart” so you can shop what’s realistic:
- Jarred or canned sour cherries in light syrup: Easiest option. You’ll drain the fruit and cook the juice with sugar and cornstarch. Great balance of tart and sweet.
- Frozen pitted sour cherries: Perfect if your store has them. Thaw in a bowl and use the juices just like you would the jarred syrup. You may need a touch more sugar.
- Fresh cherries: Gorgeous in season. Pit them (yes, it’s a little messy), then add water and sugar to create your own “juice” before thickening.
If all you can find is sweet cherries, reduce the added sugar in the filling a bit and lean on extra lemon juice to keep that tart edge. And if you absolutely love maraschino cherries, save them for the decorative top instead of the filling so things don’t taste like ice cream parlor syrup.
Cocoa, coffee, and other flavor boosters
For the sponge, Dutch-process cocoa gives a deeper, darker color and a smoother chocolate flavor. Natural cocoa works in a pinch, but the cake won’t look quite as dramatic. Hot coffee in the batter doesn’t make it taste like mocha; it just wakes up the cocoa. Hot water is fine if you’re coffee-averse, but I secretly hope you try the coffee at least once.
Buttermilk keeps the crumb tender and adds a subtle tang that plays really nicely with the cherries. If you’re out, you can fake it with milk plus a spoonful of vinegar or lemon juice. And yes, you really do want both oil and melted butter: oil for moisture, butter for flavor. Skip one and you’ll miss it.
Whipped cream essentials & stabilizer options
For the outside, stick with heavy whipping cream that’s at least 36% fat. Anything “light” or ultra-pasteurized tends to whip slowly and collapse faster. Start with cream straight from the fridge, in a cold bowl, with cold beaters; I literally toss my metal bowl into the freezer while the cakes cool.
To keep the cream from deflating, we sneak in a gentle stabilizer. Powdered sugar already has a bit of starch, so that helps. A spoonful of cornstarch or milk powder in the mix gives extra insurance without turning it into frosting. If you love a richer flavor, you can swap part of the cream for mascarpone and whip them together. Just don’t overbeat. When it looks like soft shaving cream and holds a swoopy peak, stop the mixer and walk away.
How to make the chocolate sponge
I like to mix the batter while the cherries are draining in a colander over the sink. Multitasking, but in a calm way. This sponge is very forgiving: no whipping egg whites to stiff peaks, no mystery steps, just two bowls and a whisk. It’s designed to stay moist even after a night in the fridge under all that cream.
Start with the dry team in a big bowl: flour, sugar, cocoa, baking soda, baking powder, and salt. Give everything a good whisk so there are no cocoa clumps hiding at the bottom. It should look like dark hot chocolate mix. In a separate jug or smaller bowl, whisk together the eggs, buttermilk, oil, melted butter, and vanilla. Nothing fancy, just until it looks smooth and the eggs are fully broken up.
Now for the messy-looking part. Pour the wet ingredients into the dry and whisk until you don’t see streaks of flour anymore. Don’t panic if it seems thick at this point. Then slowly stream in the hot coffee (or water), whisking gently. The batter will go from thick to very thin and glossy, almost like melted chocolate ice cream. Totally normal. This loose texture is what gives you a soft, even crumb instead of a dense, muffin-like cake.
Divide the batter between your prepared pans (I line the bottoms with parchment and lightly grease the sides; the first time I skipped parchment, half a layer stayed in the pan… oops). Tap the pans on the counter a couple of times to pop big air bubbles. Bake until the tops spring back lightly when touched and a toothpick comes out with just a few moist crumbs.
Baking and cooling without dry edges
Let the cakes cool in their pans for about 10 minutes so they can firm up, then run a thin knife around the edges and flip them onto wire racks. Peel off the parchment and let them cool completely before you even think about slicing. Warm cake plus whipped cream equals sliding disaster. If your kitchen is hot, I sometimes pop the cooled layers into the fridge for 20–30 minutes to make leveling easier. Once they’re cool and relaxed, you’re ready for cherries and syrup.
Cherry filling & soaking syrup
While the cake layers are baking and cooling, you can turn that bowl of cherries and juice into something glossy and spoonable. This is the part that separates “cute but messy” Black Forest from the kind that slices into neat, dramatic layers. The goal: cherries suspended in a thick, jammy sauce that won’t ooze all the way to the cake stand the minute you cut a slice.
Start by separating the fruit from the liquid if you haven’t already. Cherries go into one bowl, all the juice into a saucepan. In a small cup, whisk the cornstarch with a few tablespoons of the cold juice to make a smooth slurry. No lumps. If you dump dry cornstarch straight into hot liquid, you’ll get little starch pebbles forever floating around. Ask me how I know.
Thick, not runny: cornstarch slurry tips
Pour the remaining juice into the pan, add part of the sugar, and bring it just to a gentle simmer over medium heat, stirring so it doesn’t catch. Once it’s hot and the sugar is starting to dissolve, whisk in the cornstarch slurry in a slow stream. Keep the mixture moving; in about a minute it will go from cloudy to shiny and noticeably thicker, like a light jelly. If it still feels thin after bubbling for a full minute, add another small spoonful of cornstarch mixed with cold juice and repeat.
Take the pan off the heat, then stir in the drained cherries and a splash of Kirsch, if you’re using it in the filling. The heat will soften the bite of the alcohol without cooking it off completely. For a no-alcohol version, use extra cherry juice and a tiny bit of almond extract instead. Let this mixture cool to room temperature; as it sits, it will thicken even more. You’re aiming for a consistency where you can spoon it onto a plate and it mostly stays in a mound.
Syrup-soak guide: how much is too much?
For the soaking syrup, you’ve got two options: use some of the reserved cherry juice plus sugar and Kirsch, or go more neutral with water, sugar, and flavorings. Either way, the method is the same. Combine the liquid with the remaining sugar in a small saucepan and heat until the sugar dissolves. Take it off the heat, then stir in Kirsch or your alcohol-free flavorings and let it cool to just warm.
Now the big question: how much syrup should actually go on the cake? Too little and the sponge feels dry next to the cherries. Too much and you’re in soggy-bottom territory. As a general guide, plan on about 3–4 tablespoons of syrup per layer for an 8–9 inch cake, brushed on slowly with a pastry brush. The surface should look evenly damp and slightly glossy, not flooded. If you press lightly with a fingertip, it should feel moist but not squishy.
I like to do one pass with the brush over each cut surface, wait a minute to let it soak in, then do a second light pass if the sponge still looks thirsty. Remember, you’ve also got juicy cherry filling and whipped cream coming in. By the time everything rests in the fridge, those layers will be perfectly moist all the way through, not collapsing under their own syrup.
How to stabilize whipped cream
I usually whip the cream right before assembly, with the cake layers chilling and the cherry filling nice and cold. It’s the last big “project,” and it only takes a few minutes if everything is prepped. Cold is your best friend here. Warm cream is how you end up with sad, droopy swirls sliding down the sides.
Start by chilling your mixing bowl and beaters for at least 10–15 minutes. Pour in the heavy cream, then add the powdered sugar, vanilla, and your stabilizer of choice right from the start. That can be a spoonful of cornstarch, milk powder, or a bit of mascarpone. Adding it at the beginning helps it dissolve evenly instead of clumping at the end.
Begin mixing on low speed until the cream starts to look thick and foamy, then bump it up to medium. You’ll see big bubbles turn into smaller, tighter ones, and the texture will shift from liquid to soft, billowy clouds. When you lift the beaters, the cream should leave soft peaks that flop over. At this stage, you’re very close.
Keep going in short bursts, checking every 10–15 seconds. You’re aiming for stiff peaks that stand up straight but still look smooth and creamy, like shaving cream. Not grainy. If the surface starts to look rough or curdled, you’ve gone a bit too far. You can sometimes rescue it by gently folding in a splash of cold cream by hand to loosen it back up.
For extra insurance, I often scoop about one-third of the whipped cream into a piping bag for the “dam” and decorations, then keep the rest in the bowl for frosting the sides. And always keep the bowl in the fridge whenever you’re not actively using it. Stable cream plus a chilled cake means your Black Forest layers will stay tall and neat, even on day two.
Step-by-step assembly guide
This is the part where everything you’ve prepped finally comes together. I like to clear the counter, grab a lazy Susan or cake turntable if I have it, and set out all the components: cooled cake layers, cherry filling, soaking syrup, whipped cream, and a little offset spatula. Once everything’s within reach, the whole process feels more like a fun project than a juggling act.
If your kitchen runs warm, it helps to keep the cream in the fridge and just bring it out in smaller portions as you work. That way you’re not racing the clock while the sides of the cake slowly slide. Been there. Not fun.
Leveling and soaking the layers
Start by checking the tops of your cake layers. If they’ve domed in the oven, use a long serrated knife to gently saw off the rounded tops so you have flat, even surfaces. Keep your non-dominant hand flat on top of the cake and rotate it slowly while you slice, almost like you’re turning a steering wheel. You don’t need perfection here, just reasonably level.
Place the first layer, cut side up, on your serving plate or a cardboard round. Slide a few strips of parchment under the edges if you want to keep the plate clean. Take your cooled soaking syrup and a pastry brush (or a small spoon in a pinch) and start brushing the surface of the cake. Go all the way to the edges, letting the liquid sink in before adding more.
Remember that 3–4 tablespoon guideline per layer. The cake should look evenly moist and slightly darker in color, but not soggy or shiny with puddles. If you accidentally overdo it, give the layer a few extra minutes to absorb before adding the filling. It’s better to pause than to stack on a sponge that feels squishy.
The “dam” technique so cherries don’t leak
Now grab your whipped cream. Spread a thin layer (just a few spoonfuls) over the soaked cake, almost like you’re buttering toast. This gives the filling something to cling to. Then, using a piping bag fitted with a large round or star tip, pipe a thick ring of cream all around the edge of the layer. That ring is your “dam.” Its job is to hold the cherry filling in place so it doesn’t squish out the sides when you stack the next layer.
Spoon the cooled cherry filling into the center, staying inside the cream border. Smooth it gently with the back of the spoon so you have an even layer, but don’t pack it all the way to the top of the dam; leave a little height difference so the next cake layer has somewhere to sit. If you see cherries trying to escape toward the edge, nudge them back into the middle.
Carefully place the second cake layer on top, cut side up again, and press very lightly with your hands to settle it. Repeat the same steps: soak with syrup, spread a thin swipe of cream, pipe your dam, add more cherry filling. If you’re doing three layers of cake, you’ll have two layers of filling; if it’s just two cake layers, you’ll probably have some extra cherries left for garnish.
Chocolate shavings and bark, the easy way
Once all your layers are stacked and the top is on, give the whole cake a light crumb coat: a thin layer of whipped cream over the top and sides to catch any loose crumbs. Chill it for 10–15 minutes, then add a thicker, final coat of cream, smoothing it with an offset spatula or the back of a spoon. It doesn’t have to be bakery-perfect; a few swoops and swirls look charming.
For the chocolate, you’ve got two simple options. The easiest is to take a bar of semi-sweet or dark chocolate and use a vegetable peeler along the long edge to create curls and shavings onto a piece of parchment. Keep the bar at room temperature; too cold and it just chips. Then, gently press the shavings onto the sides of the cake with your hand, catching whatever falls onto the parchment and reusing it.
If you want more dramatic “bark,” melt the chocolate, spread it thinly over the back of a clean baking sheet or piece of parchment, and let it set until firm but not rock hard. Use a spatula or knife to gently scrape and lift off big, rustic shards. Arrange those around the sides or on top. Finish with piped rosettes of cream around the top edge and a cherry on each swirl. At this point, it looks like it came from a fancy bakery, but you know the truth: it’s built from simple, careful layers in your own kitchen.
Make-ahead schedule, storage & freezing
If you’ve ever tried to make a layered cake start to finish on the same day as a birthday dinner, you know the feeling. Sticky counters, clock ticking, frosting sliding while guests are parking outside. That’s why I almost always treat Black Forest Cake as a 2-day project. The flavor actually improves with a good overnight rest, so you’re not just saving your sanity, you’re making the cake better.
Here’s a simple schedule that works well:
Day 1 (Bake + cherries):
Bake the chocolate layers in the afternoon, cool them completely, then wrap each one tightly in plastic and chill. At the same time, cook the cherry filling and soaking syrup. Let both cool, then store the filling in an airtight container in the fridge and the syrup in a jar. By bedtime, everything is cold and relaxed, and you’re basically done with the “hard” part. Dishes washed, kitchen calm.
Day 2 (Assemble + chill):
Level the chilled cakes, brush with syrup, add the cherry filling and whipped cream, then frost and decorate. Once assembled, cover the cake loosely with a big bowl or a cake dome so the cream doesn’t dry out, and refrigerate for at least 4 hours before serving. Overnight is even better. The syrup redistributes, the layers settle, and you get those neat, clean slices instead of sliding towers.
For storage, keep the finished cake in the fridge, lightly covered, and enjoy within 2 to 3 days. The cream stays stable and the sponge stays moist, especially because of that syrup soak. After day three, it’s still safe, but the texture starts to decline and the cream can pick up fridge smells, so try not to stash it next to cut onions. Learned that one the hard way.
Freezing is trickier because of the whipped cream, so here’s the compromise. You can freeze the plain cake layers, well wrapped, for up to 2 months and thaw them overnight in the fridge before assembling. You can also freeze leftover slices of the fully assembled cake in an airtight container if you really need to, but the cream will lose some of its fluffy texture when it thaws. Still tasty, just not showpiece material. Perfect for late-night “I deserve cake” moments.
Black Forest Cake Printable Recipe Card
Authentic Black Forest Cake (Schwarzwälder Kirschtorte)
A tall, classic Black Forest cake with moist chocolate sponge, tart cherry filling, and fluffy stabilized whipped cream. Includes Kirsch and alcohol-free options plus a make-ahead schedule.
Ingredients
For the Chocolate Cake Layers:
- 2 cups granulated sugar
- 1 3/4 cups all-purpose flour
- 3/4 cup Dutch-process cocoa powder, sifted
- 2 teaspoons baking soda
- 1 teaspoon baking powder
- 1 teaspoon fine salt
- 2 large eggs, at room temperature
- 1 cup buttermilk, at room temperature
- 1/2 cup vegetable oil
- 1/2 cup unsalted butter, melted and slightly cooled
- 1 cup hot brewed coffee (or hot water)
- 2 teaspoons vanilla extract
For the Cherry Filling & Syrup:
- 2 cans (about 24 ounces total) pitted sour or Morello cherries in light syrup, juice reserved separately
- 3/4 cup granulated sugar, divided (1/2 cup for filling, 1/4 cup for syrup)
- 1/4 cup cornstarch
- 1/2 cup Kirsch (cherry liqueur), divided (1/4 cup for filling, 1/4 cup for syrup)
- 2–4 tablespoons water or extra cherry juice, as needed
For the Stabilized Whipped Cream:
- 4 cups heavy whipping cream, very cold
- 1/2 cup powdered sugar
- 1 tablespoon cornstarch or nonfat dry milk powder
- 1 teaspoon vanilla extract
For Decoration:
- 4 ounces semisweet or dark chocolate bar (for curls and shavings)
- 12 whole cherries with stems (fresh or maraschino)
Instructions
- Prep three 8-inch (or two 9-inch) round cake pans by greasing the sides and lining the bottoms with parchment paper; preheat oven to 350°F (175°C).
- Drain the cherries over a bowl, reserving all of the juice; set the cherries aside in a separate bowl.
- In a large bowl, whisk together sugar, flour, cocoa powder, baking soda, baking powder, and salt until well combined.
- In a second bowl or large measuring jug, whisk together eggs, buttermilk, vegetable oil, melted butter, and vanilla until smooth.
- Pour the wet mixture into the dry ingredients and whisk just until no streaks of flour remain; slowly whisk in the hot coffee (or water) until the batter is thin and glossy.
- Divide the batter evenly between the prepared pans and bake for 28–35 minutes, or until the tops spring back and a toothpick comes out with a few moist crumbs.
- Cool the cakes in the pans for 10 minutes, then run a knife around the edges, turn out onto wire racks, peel off parchment, and cool completely; wrap and chill if making ahead.
- To make the cherry filling, combine most of the reserved cherry juice (save 1/2 cup for syrup) and 1/2 cup sugar in a saucepan and bring to a gentle simmer over medium heat.
- In a small cup, whisk cornstarch with a few tablespoons of cold cherry juice or water to make a smooth slurry with no lumps.
- Slowly whisk the cornstarch slurry into the simmering juice, cooking and stirring until the mixture thickens and looks glossy, 1–2 minutes.
- Remove from heat, stir in the drained cherries and 1/4 cup Kirsch (or extra cherry juice for non-alcoholic), then let the filling cool completely until thick and spoonable.
- For the soaking syrup, combine 1/2 cup reserved cherry juice, remaining 1/4 cup sugar, and 1/4 cup Kirsch (or extra juice) in a small saucepan; heat just until the sugar dissolves, then cool to room temperature.
- Chill a mixing bowl and beaters for at least 10–15 minutes, then add cold heavy cream, powdered sugar, cornstarch or milk powder, and vanilla.
- Beat on low until slightly thickened, then increase to medium and whip until the cream forms stiff but smooth peaks; do not overbeat.
- Level the cooled cake layers with a serrated knife if domed, then place the first layer cut side up on a serving plate or cake board.
- Brush the top of the first layer with 3–4 tablespoons of cherry syrup, letting it soak in until the surface looks evenly moist but not soggy.
- Spread a thin layer of whipped cream over the soaked layer, then pipe a thick ring (dam) of cream around the edge to hold in the filling.
- Spoon a generous layer of cooled cherry filling inside the cream dam, smoothing it gently into an even layer.
- Place the second cake layer on top, cut side up, and repeat the soaking, thin cream layer, cream dam, and cherry filling; top with the final cake layer, cut side down.
- Cover the top and sides of the cake with a thin crumb coat of whipped cream, chill for 10–15 minutes, then add a thicker final coat and smooth or swirl as desired.
- Use a vegetable peeler on the long side of the chocolate bar to create curls and shavings; gently press the chocolate around the sides of the cake and sprinkle some on top.
- Pipe rosettes of whipped cream around the top edge and place a whole cherry on each rosette; chill the cake for at least 4 hours or overnight before slicing and serving.
Notes
- Use Dutch-process cocoa for the deepest color and smooth chocolate flavor, but natural cocoa can be used in a pinch.
- For an alcohol-free version, replace all Kirsch with an equal amount of cherry juice and add about 1 teaspoon almond extract divided between the filling and syrup.
- Aim for about 3–4 tablespoons of soaking syrup per cake layer so the sponge is moist but not soggy.
- Make this cake over two days for the best flavor and less stress: bake cakes and cook filling on Day 1, then assemble and decorate on Day 2.
- Keep the cake refrigerated and enjoy within 2–3 days for the best texture and flavor.
- Freeze undecorated cake layers (well wrapped) for up to 2 months; thaw overnight in the fridge before soaking and filling.
- If your whipped cream starts to look grainy, fold in a splash of cold cream by hand to smooth it out.
- Chill the cake well before slicing; a long serrated knife and gentle sawing motion will give you neat layers.
Nutrition Information:
Yield: 12 servings Serving Size: 1Amount Per Serving: Calories: 620Total Fat: 36gSaturated Fat: 22gCarbohydrates: 70gSugar: 52gProtein: 7g
Nutrition values are estimates and will vary based on ingredients and brands.
Black Forest Cake FAQ
Final thoughts
There’s always a moment, right before you pour hot coffee into that thin chocolate batter, where it feels like this whole project might be “too much.” Too many bowls, too many steps, too many chances to mess up. But once you’ve done it once, the rhythm of this cake sinks in. Bake. Soak. Fill. Chill. It turns into a little ritual.
The magic of Black Forest isn’t that it’s fancy. It’s that everything is doing a job. The buttermilk-and-coffee sponge stays soft even after a night in the fridge. The thickened cherry filling refuses to leak. The whipped cream is just sweet enough and sturdy enough to hold its shape while you carry the cake to the table. And when you cut that first slice and see clean layers instead of a collapsing cherry landslide? Very satisfying.
If you’re nervous, treat your first run as a practice round for people who already love you. Make it on a quiet Friday night, let it rest, and share it on Saturday with whoever’s around. My neighbor swore she “wasn’t a cherry person” until she met this version. The tart fruit and dark chocolate converted her.
And if you fall in love with the whole chocolate-cherry-cream situation, you’ve got easy ways to spin it off next time: cupcakes for a party, a quick mug cake when you just need one serving, brownies with the same cherry filling swirled on top. But for the full showpiece, this tall, syrup-soaked torte is the one you’ll come back to when you want the bakery-window effect right in your own kitchen.
Love This Recipe? Discover More Classic Layer Cake Favorites
If this layer cake hit the spot, don’t miss The Ultimate Guide to Classic Layer Cakes where you’ll find more timeless flavors, smart frosting pairings, and easy fixes for every leaning, crumbly slice.