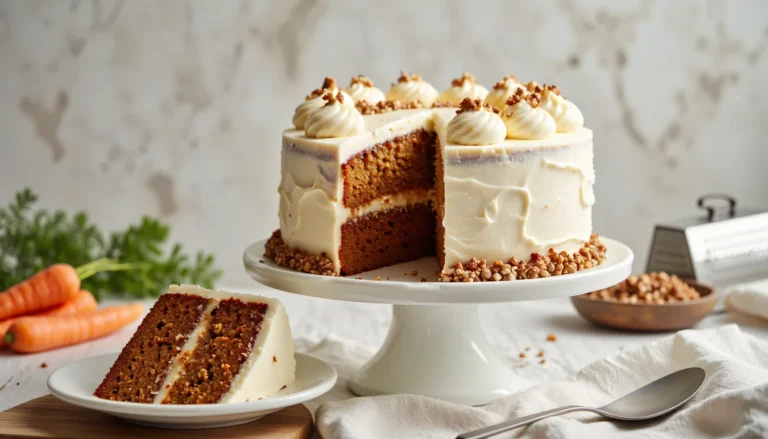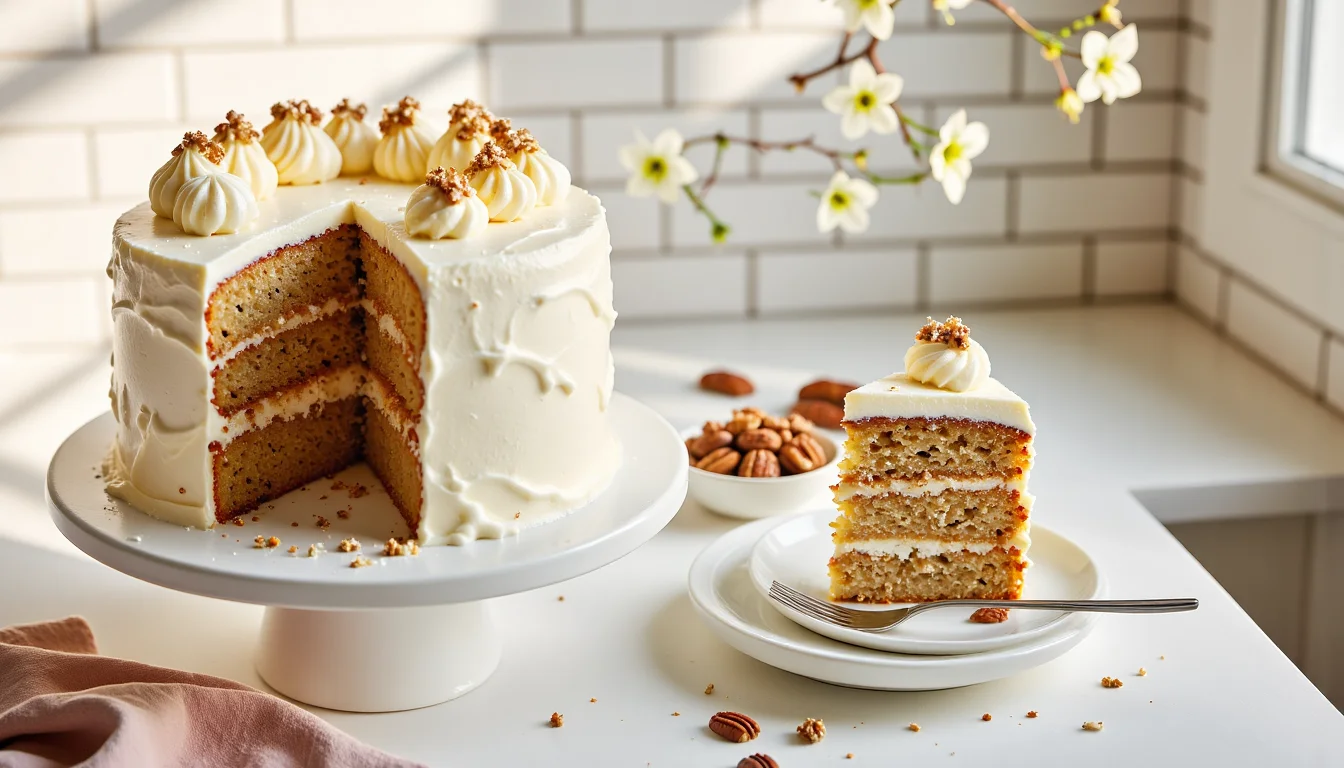
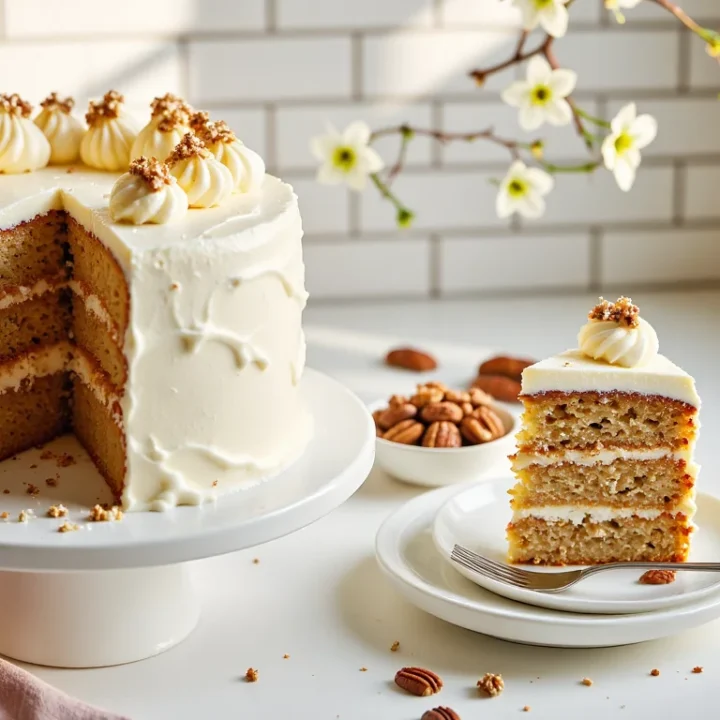
The Best Southern Hummingbird Cake Recipe (Ultra Moist)
It was a warm Sunday in April, windows cracked open, and my neighbor Miss Janice leaned over the fence to ask, “Are you the one making that banana cake that smells like vacation?” Not quite. I was pulling a tall, pineapple-banana layer cake out of the oven, still sizzling around the edges and perfuming the whole house with cinnamon and toasted pecans.
If you’ve never tried it, people in the South treat this as the queen of celebration cakes. It tastes like banana bread and pineapple upside-down cake got dressed up for Easter brunch, then showed up with a bowl of cream cheese frosting. Sweet, a little tangy, full of texture. The kind of slice you eat slowly, crumb by crumb.
Anyway, here’s the thing. A lot of versions look gorgeous online, but in real life the layers dry out, the frosting slides off, or the middle sinks just enough to make you mutter under your breath while the kids are doing homework at the kitchen table. Total disaster. I’ve been there. I once tried to frost a still-warm layer and watched the icing melt right off the sides like lava.
This version is built to fix all of that. The batter is 100% oil based with overripe bananas and undrained pineapple, so the crumb stays soft and plush for days, not just on baking day. And we’ll toast the pecans first so you get that deep, nutty flavor in every bite instead of pale, waxy nuts hiding in the background.
The real magic, though, is the frosting. We’ll use a simple “cold cream cheese” trick, where cool blocks of cream cheese get beaten into fluffy butter and sugar so your frosting stays thick, smooth, and stackable instead of runny. No sliding tiers. No gloopy sides. Just a tall, Southern layer cake that’s ready for Easter, Mother’s Day, or any random Tuesday where you need a little extra sweetness on the counter.
Craving more tall, bakery-style cakes? Head over to The Ultimate Guide to Classic Layer Cakes for step-by-step stacking tips, crumb coat secrets, and seven must-bake classics.
What is Hummingbird Cake? (History & Origins)
Picture a church potluck table in the 1970s South: pound cake, coconut pie, a little Jell-O situation, and then this tall, pineapple-banana creation that everyone whispers about. That’s the kind of legacy this Southern classic is working with. It’s not a new “viral” dessert. It’s an old-school, pass-the-pan-down kind of cake with roots that reach past the American South.
The story starts in Jamaica, where the national bird is the Doctor Bird, a type of hummingbird with bright, iridescent feathers. The nickname “hummingbird cake” likely came from a similar banana-pineapple spice cake that was so sweet and fragrant people joked it could attract hummingbirds to the table. Sweet enough for the birds. Sweet enough for us.
At some point, that tropical-style cake made its way into Southern kitchens and eventually into Southern Living magazine in 1978, credited to Mrs. L. H. Wiggins. After that, it pretty much took off. My aunt still has a stained magazine clipping tucked inside a church cookbook, folded to the exact page with her notes scribbled in the margins.
Why is it called Hummingbird Cake?
There are a few stories, but they all circle the same idea: sweetness and attraction. One version says the cake got its name because it’s so sugary and fruity that hummingbirds would be drawn to it the way they’re drawn to nectar. Another theory is that people went quiet when they took a bite, like little birds at a feeder, just happily nibbling.
Either way, the name stuck because it feels whimsical and a little romantic. And let’s be honest. “Pineapple banana spice layer cake with cream cheese frosting” is accurate, but not exactly charming on a recipe card.
What does hummingbird cake taste like?
Think super moist banana bread, but lighter and softer, with juicy bits of pineapple tucked into a warmly spiced crumb. The bananas bring that familiar comfort flavor, the pineapple adds brightness and tang, and the toasted pecans give you little buttery, crunchy pockets in every slice.
On top of all that, you’ve got thick cream cheese frosting that’s sweet but slightly tangy, so it balances the richness of the layers underneath. Each bite is dense yet tender, fruity without being tropical-cocktail sweet. It’s the kind of cake where you plan on one slice and somehow end up “evening out the edges” with a fork in the fridge later.
Why You’ll Love This Recipe
If you’ve baked a version of this cake before and thought, “Why is this so heavy and wet in the middle?” you’re in the right place. I built this one to be plush and moist without crossing into gummy territory, so you get a tender crumb that actually cuts cleanly. You can stack the layers, slice them, and still see those pretty flecks of banana, pineapple, and pecans instead of a collapsed brick on your plate.
Texture-wise, it leans cozy and dense in the best way. The bananas and undrained pineapple keep everything soft for days, while the toasted pecans add a gentle crunch that makes each bite feel a little special. No dry edges. No sad, crumbly wedges left behind on the cake stand. Just a richly spiced, banana-pineapple situation that tastes like it belongs at a family gathering.
You’ll also love how approachable it is. There’s no creaming butter and sugar forever, no fancy folding technique, no special equipment. You whisk the dry ingredients, whisk the wet, then bring them together without overmixing. I’ve made this late at night in an old metal mixing bowl while my sister texted me asking for “pictures of the batter,” and it turned out beautifully even with my slightly chaotic energy.
And then there’s the frosting. That cold cream cheese method means your icing stays thick and smooth, not runny or soupy, so the layers don’t slide around when you try to assemble the cake. It pipes nicely, it swirls easily, and it holds those pretty pecan decorations like a dream. So if you’re looking for a fruity, spiced layer cake that you can bake ahead, frost without fear, and proudly serve to guests, this one checks all the boxes.
Key Ingredients & Substitutions
Before you preheat the oven, it helps to know which ingredients really matter here and which ones you can wiggle a little. This isn’t the place to freestyle with coconut oil and mystery “flour blends” from the back of the pantry. A few key choices are what keep the crumb tender instead of heavy and gluey.
Bananas: You want very ripe, spotty bananas, the kind you’d be slightly embarrassed to leave on the counter if company dropped by. The darker the peel, the sweeter and softer the fruit, which means better flavor and moisture in the finished layers. If your bananas are just yellow, let them sit a day or two or pop them in a paper bag with an apple to speed things up.
Pineapple: Go for canned crushed pineapple in juice, not syrup. The small pieces tuck neatly into the batter so you don’t end up with weird pineapple pockets. That gentle tang keeps the cake from tasting like straight banana bread. And the juice? Liquid gold. It helps hydrate the batter and adds a subtle tropical flavor.
Oil vs Butter: Here we use a neutral oil like vegetable or canola. Oil stays liquid at room temperature, so the crumb stays soft and moist even after a few days in the fridge. Butter tastes amazing, but it firms up when chilled and can make a cake feel dry once it’s cold. If you really want a bit of butter flavor, you can add a tablespoon or two of melted butter without messing up the texture, but don’t swap all the oil.
Pecans: Toasting is non-negotiable. Scatter the nuts on a baking sheet and toast until fragrant before chopping. It takes just a few minutes, and the difference between raw, waxy pecans and toasted, buttery ones is huge. I’ve forgotten this step before and literally picked out the sad nuts while the layers cooled. Learn from my chaos.
Spices: Cinnamon is the base note, with a little allspice or nutmeg for warmth. If you don’t have allspice, a pinch of extra cinnamon plus a tiny grate of nutmeg works fine. Just don’t go so heavy on spice that it masks the banana and pineapple.
Eggs: Make sure they’re at room temperature. Cold eggs can seize the oil and make the batter harder to mix smoothly. I usually set mine out on the counter while I toast the pecans and prep the pans.
Do you drain the pineapple for hummingbird cake?
Short answer: No. You do not drain the pineapple for hummingbird cake. You want the fruit and all of its juice going straight into the batter. That liquid adds moisture and a gentle pineapple flavor that runs through the whole crumb.
If you’re worried about the layers being too soft, you have two options. First, make sure you’re measuring your flour correctly and not packing it into the cup. Too much flour plus all that juice can make things dense. Second, for a deeper pineapple flavor without extra sogginess, you can tip the can into a small saucepan and simmer it for a few minutes to reduce the juice slightly before it cools and goes into the batter. Totally optional. But very fun if you like to nerd out in the kitchen.
Overview: How to Make Hummingbird Cake
Let’s walk through the whole process so you can see what’s coming before you crack an egg. Big picture: toast nuts, mix dry, mix wet, bring it all together gently, bake, cool, frost. No mixer needed for the cake itself, just a couple of bowls and a whisk. You’ve got this.
1. Prep the pans and toast the pecans.
Start by heating the oven to 350°F and prepping your cake pans. Grease and flour three 8-inch pans (or two 9-inch), then line the bottoms with parchment if you have it. At the same time, spread the pecans on a baking sheet and toast them until they smell nutty and deepen in color. Cool, then chop. I usually do this first thing so the nuts are ready and out of the way before I start making a mess.
2. Whisk the dry ingredients.
In a big mixing bowl, whisk together the flour, sugar, baking soda, salt, cinnamon, and allspice. You want everything evenly combined so you do not get surprise pockets of baking soda. This step also helps fluff the flour a bit so the crumb stays light instead of clumpy.
3. Mix the wet ingredients and fruit.
In another bowl, whisk the eggs, oil, and vanilla until smooth and glossy. Stir in the mashed bananas and the entire can of crushed pineapple with its juice. The mixture will look a little loose and lumpy from the fruit. That is exactly what you want.
4. Combine wet and dry without overmixing.
Pour the wet mixture into the dry ingredients and gently stir with a spatula or wooden spoon. Scrape the bottom and sides of the bowl, but stop as soon as you no longer see streaks of dry flour. Overmixing is how you get tough, rubbery layers. We are not doing that today.
5. Fold in the toasted pecans.
Sprinkle the chopped, toasted pecans over the batter and fold them in with just a few turns of the spatula. They should be evenly scattered, not beaten in. This keeps the batter airy and helps the nuts stay distinct in the crumb.
6. Bake until set and golden.
Divide the batter between your prepared pans. I like to use a scoop or measuring cup so the layers bake evenly. Bake until the tops are lightly golden and a toothpick comes out with a few moist crumbs, 25 to 35 minutes depending on your pan size and oven. If one layer looks done earlier, you can pull it while the others finish.
7. Cool completely before frosting.
Let the cakes cool in the pans for about 10 to 15 minutes, then turn them out onto a wire rack. Peel off the parchment and let them cool all the way to room temperature. No shortcuts here. I once tried to frost a warm hummingbird layer and ended up with a cream cheese landslide. Learn from my mistake and wait until the layers are completely cool before you move on to that gorgeous frosting.
The Secret to Perfect Cream Cheese Frosting
Let’s be honest. Cream cheese frosting can be a little diva-ish. One minute it’s thick and dreamy in the bowl, and the next it’s sliding slowly down the side of your cake like it’s given up on life. The trick for this hummingbird cake is treating temperature and order like non-negotiables, not suggestions.
Here’s the game plan. Start with room temperature butter and cool, slightly cold cream cheese. Not rock hard, but straight from the fridge or only out for a few minutes. The butter gives you that fluffy, pipeable base. The colder cream cheese firms everything up so it doesn’t turn soupy. I’ve tried the “everything at room temp” approach and ended up shoving a frosted cake into the fridge in a mild panic while my kids circled the kitchen asking, “Is it ready yet?”
First, beat the butter with some of the powdered sugar until it’s light, pale, and fluffy. You’re building structure here. Think 2 to 3 minutes of mixing, scraping the bowl a couple of times so no sneaky butter chunks hide at the bottom. Once that mixture looks like thick vanilla frosting, you’re ready for the cream cheese.
Cut the cold cream cheese into chunks and add them a few pieces at a time, mixing on low to medium speed. Let each batch mostly disappear before adding the next. You want it fully combined, but you don’t want to whip it forever. Overbeating cream cheese can make it loosen and go runny. We’re aiming for smooth, thick, and spreadable that holds soft peaks on the spatula.
Sift your powdered sugar before it hits the bowl if you can. It feels fussy, but it keeps lumps out and helps the frosting stay silky. Add the rest of the sugar gradually, tasting as you go so you can stop when it’s sweet enough for you. Finish with vanilla and a pinch of salt to tame the sweetness. That little bit of salt makes a big difference.
When it’s ready, the frosting should feel sturdy but soft, like it wants to cling to the cake instead of slide off. If it ever seems too loose, pop the bowl into the fridge for 15 to 20 minutes, then give it a quick stir. After that, you’ll be ready to stack your layers, swirl big swoops on top, and press toasted pecans around the sides without a single frosting meltdown.
Storage & Freezing Guidelines
Once you’ve baked and frosted this beauty, you’ve basically committed to a fridge cake. The cream cheese frosting needs to stay chilled, and honestly, the flavor and texture are even better cold. It’s one of those desserts you sneak forkfuls of straight from the fridge door. No regrets.
For short-term storage, cover the cake and refrigerate for up to 5 days. If it’s a whole layer cake, I like to chill it uncovered for 20–30 minutes first so the frosting firms up, then gently wrap the outside of the cake stand in plastic wrap or use a tall cake carrier. If it’s sliced, press a piece of parchment against the cut edges to keep them from drying out, then cover the whole thing. The crumb stays moist thanks to the oil, bananas, and pineapple, so you’re not eating sad leftovers on day three.
For longer storage, freezing is your best friend. You’ve got two options:
• Freeze the layers plain: Bake, cool completely, then wrap each unfrosted layer tightly in plastic wrap and then in foil. Freeze for up to 2 months. When you’re ready to assemble, thaw the layers in the fridge overnight, then bring them to cool room temp before frosting. I’ve done this ahead of Easter weekend while juggling a million other things, and it makes “big dessert day” feel so much calmer.
• Freeze leftover slices: Chill the frosted cake until the frosting is firm, then slice. Wrap each slice in plastic wrap and pop into a freezer bag or airtight container. Thaw slices in the fridge or on the counter for 20–30 minutes before serving.
If you’re planning this for an event, here’s an easy timeline:
• Day 1: Bake the layers, cool, and wrap. Store at room temp if serving the next day, or refrigerate if your kitchen runs warm.
• Day 2: Make the cream cheese frosting, assemble, and decorate the cake. Chill for at least 30 minutes to set the frosting.
• Day 3: Serve straight from the fridge or let it sit at room temp for 20–30 minutes to take the chill off before slicing.
Just remember: because of the cream cheese, this isn’t a cake that can sit out on the counter all day. A couple of hours for serving is fine, but after that, tuck it back into the fridge so it stays safe, moist, and delicious.
Southern Hummingbird Cake Printable Recipe Card
Classic Southern Hummingbird Cake
A super moist pineapple-banana layer cake with toasted pecans and a thick, stable cream cheese frosting. Classic Southern flavor, easy one-bowl batter, perfect for spring holidays or birthdays.
Ingredients
For the Cake:
- 3 cups all-purpose flour, spooned and leveled
- 2 cups sugar (or 1 cup granulated sugar and 1 cup light brown sugar, packed)
- 1 teaspoon baking soda
- 1 teaspoon fine sea salt
- 1 1/2 teaspoons ground cinnamon
- 1/2 teaspoon ground allspice (or nutmeg)
- 3 large eggs, at room temperature
- 1 cup vegetable or canola oil
- 2 teaspoons vanilla extract
- 1 can (8 ounces) crushed pineapple in juice, undrained
- 4 very ripe bananas, mashed (about 2 cups)
- 1 cup pecans, toasted and chopped
For the Cream Cheese Frosting:
- 1 cup (2 sticks) unsalted butter, at room temperature
- 16 ounces full-fat cream cheese, cool and slightly firm
- 5 to 6 cups powdered sugar, sifted
- 2 teaspoons vanilla extract
- Pinch of fine sea salt
For Garnish (Optional):
- Extra toasted pecan halves or chopped pecans
Instructions
- Preheat the oven to 350°F (175°C). Grease and flour three 8-inch round cake pans or two 9-inch pans, and line the bottoms with parchment paper if you have it.
- Spread the pecans on a baking sheet and toast in the oven for 5 to 7 minutes, until fragrant and slightly darker. Let cool completely, then chop and set aside.
- In a large mixing bowl, whisk together the flour, sugar, baking soda, salt, cinnamon, and allspice until everything is evenly combined.
- In a separate bowl, whisk the eggs, oil, and vanilla until smooth. Stir in the mashed bananas and the entire can of crushed pineapple with all of its juice.
- Pour the wet mixture into the dry ingredients. Gently stir with a spatula or wooden spoon just until you no longer see dry streaks of flour. Do not overmix.
- Fold the toasted chopped pecans into the batter with a few gentle strokes, just until they are evenly distributed.
- Divide the batter evenly among the prepared pans. Smooth the tops and bake for 25 to 35 minutes, or until the cakes are lightly golden, the centers spring back when touched, and a toothpick inserted in the center comes out with a few moist crumbs.
- Let the cakes cool in the pans on a wire rack for 10 to 15 minutes. Run a knife around the edges, turn the layers out onto the rack, peel off the parchment, and let them cool completely.
- To make the frosting, beat the room temperature butter with about 2 cups of the sifted powdered sugar until very light and fluffy, 2 to 3 minutes, scraping the bowl as needed.
- Add the cool cream cheese in chunks, beating on low to medium speed just until smooth and fully combined. Do not overbeat once the cream cheese is added.
- Gradually add the remaining powdered sugar until the frosting is thick, smooth, and sweet to your taste. Beat in the vanilla and a pinch of salt.
- If needed, chill the frosting for 15 to 20 minutes to firm it up before assembling the cake.
- Level the cooled cake layers if they are domed. Place the first layer on a serving plate, spread a generous layer of cream cheese frosting over the top, and repeat with the remaining layers.
- Use the remaining frosting to cover the sides and top of the cake, creating soft swirls.
- Garnish with extra toasted pecan halves or chopped pecans on top and around the edges, if desired. Chill the cake for at least 30 minutes to set the frosting before slicing and serving.
Notes
- Use very ripe, spotty bananas for the best sweetness and moisture in the cake.
- Do not drain the crushed pineapple; the juice helps keep the cake extra moist and flavorful.
- Measure the flour by spooning it into the cup and leveling it off to avoid packing in too much and turning the cake dense.
- Make sure the eggs are at room temperature so they mix smoothly with the oil and fruit mixture.
- Toast the pecans before adding them to the batter for deeper, nuttier flavor in every bite.
- If the frosting feels too soft, chill it briefly, then stir before frosting the cake.
- The cake can be baked a day ahead, wrapped tightly once cool, and frosted the next day.
- Store leftover cake covered in the refrigerator for up to 5 days; serve slices slightly chilled or at cool room temperature.
- Unfrosted cake layers can be wrapped well and frozen for up to 2 months; thaw overnight in the fridge before frosting.
- Frosted leftover slices can be individually wrapped and frozen, then thawed in the fridge or at room temperature before serving.
Nutrition Information:
Yield: 12 Serving Size: 1 sliceAmount Per Serving: Calories: 950Total Fat: 55gSaturated Fat: 19gTrans Fat: 1gUnsaturated Fat: 35gCholesterol: 90mgSodium: 430mgCarbohydrates: 120gNet Carbohydrates: 117gFiber: 3gSugar: 90gSugar Alcohols: 0gProtein: 8g
Nutrition values are estimates only and will vary based on brands, measuring methods, and ingredient substitutions.
Frequently Asked Questions
Love This Recipe? Discover More Classic Layer Cake Favorites
If this layer cake hit the spot, don’t miss The Ultimate Guide to Classic Layer Cakes where you’ll find more timeless flavors, smart frosting pairings, and easy fixes for every leaning, crumbly slice.