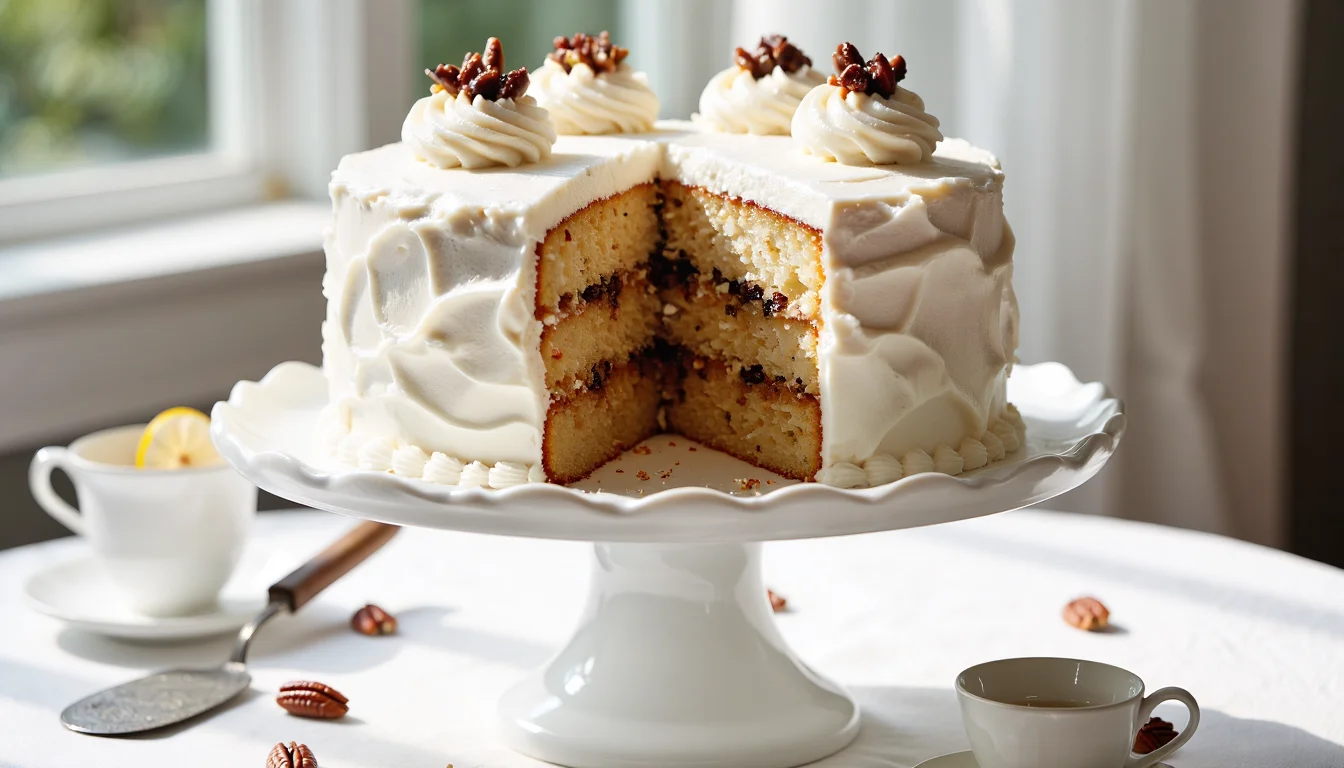
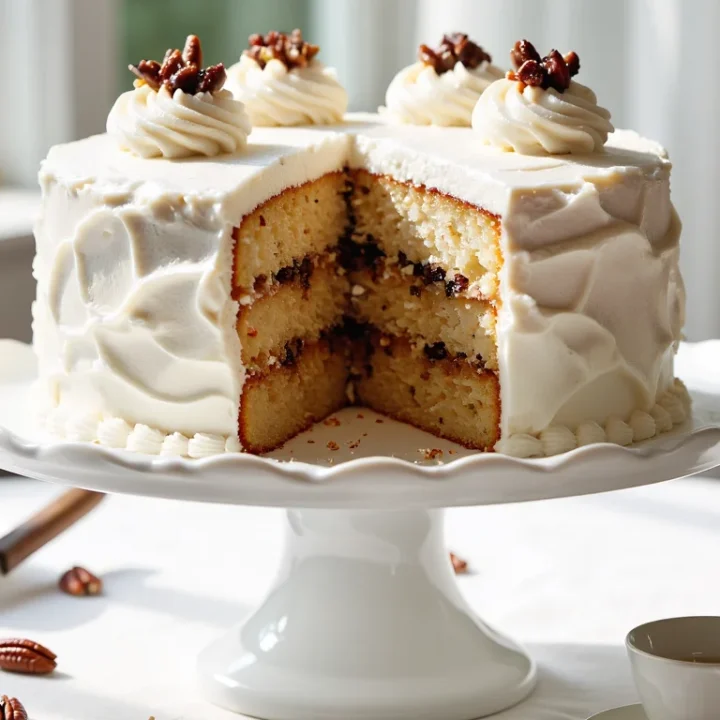
Classic Lady Baltimore Cake (Authentic Southern Recipe)
If you’ve ever flipped through an old church cookbook and stopped at a frosted tower called “Lady Baltimore,” this is that cake. The one that looks like it belongs at a Southern wedding, not on a Tuesday night dessert plate.
I first baked it for a friend who loves old novels and even older recipes. Total gamble. I’d only seen grainy photos and a mention of figs, raisins, and something boozy. But when we cut the first slice and that snowy white frosting gave way to a hidden layer of fruit and nuts, everyone at the table just went quiet for a second. Then gone.
This is a celebration cake. Tall, tender white layers, a rich fruit-and-nut filling soaked in sherry (or tea), and a billowy, marshmallowy frosting that looks like clouds. It feels fancy, almost fussy.
But here’s the secret: if you can bake a basic birthday cake and use a hand mixer, you can pull this off. I’ll walk you through the history, the ingredients, and the exact steps so your Lady Baltimore Cake looks like it came from an old Charleston tea room, not from a stressful all-day project.
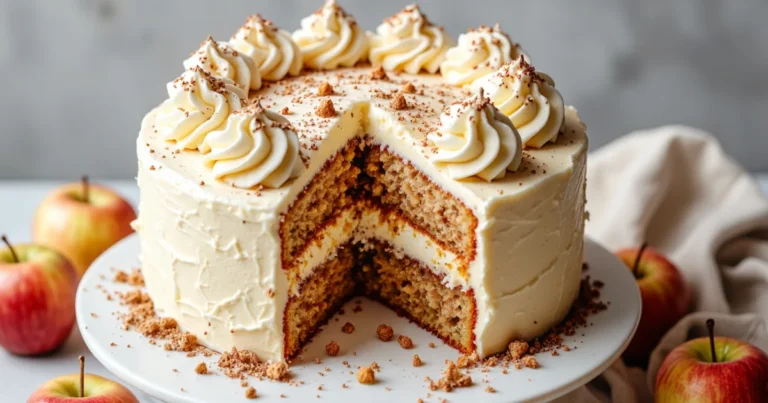
Craving more tall, bakery-style cakes? Head over to The Ultimate Guide to Classic Layer Cakes for step-by-step stacking tips, crumb coat secrets, and seven must-bake classics.
What Is a Lady Baltimore Cake?
At its heart, Lady Baltimore Cake is an old-fashioned Southern party cake: tall white layers, a lush fruit-and-nut filling, and a fluffy, glossy cooked frosting. Think of it as the elegant cousin of a classic white birthday cake. Same basic idea, but dressed for a ball.
The structure is simple. Tender white cake layers made with cake flour and egg whites only. Between them, a mixture of chopped figs, raisins, and toasted nuts that have been soaked in something flavorful like sherry or strong tea. Everything is wrapped in a cloud of seven-minute icing that sets into a soft, marshmallowy shell. Messy to slice. Completely worth it.
It looks fancy on a pedestal stand with those swirls of white, but each component is surprisingly straightforward once you break it down. And that’s what we’re doing here.
What flavor is Lady Baltimore Cake?
If you’ve never tasted it, imagine this: light vanilla-almond cake, a little floral from the sherry, with pockets of chewy fruit and crunchy nuts, all coated in sweet, marshmallow-like frosting. No chocolate, no caramel, nothing dark or heavy.
The overall flavor is delicate but not shy. You get vanilla first, then the tangy-sweet figs and raisins, then a warm, nutty finish. The frosting is quite sweet, which is why the filling leans slightly boozy or tea-like. It keeps everything from tasting like plain sugar-on-sugar.
A quick history: the novel & the Charleston tea room
This showstopper didn’t start in a bakery. It started in a book. In 1906, author Owen Wister wrote a popular novel where a grand white cake served at a Charleston tea room stole the spotlight, and readers immediately wanted the recipe.
Soon, real-life cooks and tea rooms began serving their own versions of the “Lady Baltimore” described in the story, and newspaper columns spread the formula: white cake, fruit and nut filling, boiled icing. Over time, Southern home bakers adopted it as a special-occasion dessert for weddings, holidays, and big church socials.
So when you bake it today, you’re basically recreating a piece of early 1900s dessert fan fiction that became a true Southern classic.
Lady vs. Lord Baltimore vs. Lane Cake
Here’s where things get confusing. There isn’t just one “Baltimore” cake floating around in old cookbooks. There’s the original white, frilly Lady version; her richer, golden cousin called Lord Baltimore; and then a completely separate Southern celebrity: Lane Cake.
Think of it this way: Lady Baltimore is the elegant white party dress. Lord Baltimore is the same dress in deep gold satin. Lane Cake is the eccentric aunt who shows up in sequins and bourbon. All related in spirit, but absolutely not the same dessert.
Lady uses a pure white cake made only with whipped egg whites, plus that signature fruit-and-nut filling and fluffy boiled icing. Lord Baltimore was created as a clever “use up the yolks” solution, so the cake layers are buttery and yellow. Lane Cake keeps the fruit and nuts but goes heavy on coconut and whiskey or bourbon, with a rich cooked filling that tastes almost like boozy candy.
So if you’ve seen recipes that look similar but not quite right, you probably ran into one of the cousins.
Key differences at a glance
- Cake color & eggs
- Lady: white layers made with egg whites only.
- Lord: yellow layers made with egg yolks.
- Lane: usually a simple white or yellow butter cake.
- Filling
- Lady: figs, raisins, nuts, lightly boozy or tea-soaked.
- Lord: very similar fruit-and-nut mix, sometimes a bit richer.
- Lane: fruit and nuts plus coconut in a thick, custardy bourbon filling.
- Frosting
- Lady & Lord: fluffy seven-minute or boiled icing.
- Lane: often the same icing style, but some modern versions use buttercream.
Same Southern family, very different personalities. For this recipe, we’re staying loyal to the classic white Lady.
The Three Essential Components
When you strip away the history and the name, this cake is really just three pieces that work together: soft white layers, a jewel-box filling, and a shiny, fluffy frosting. Once you understand each part, the whole thing feels less like a mystery and more like a fun weekend project.
I like to think of it in layers of texture. Tender. Chewy. Cloudy. Each one matters, and each one is totally doable in a home kitchen.
1. The tender white cake layers
The base is a classic white cake made with cake flour, butter, sugar, milk, and only the egg whites. Using cake flour keeps the crumb fine and soft, while whipped egg whites give extra lift so your layers bake up tall instead of squat and dense.
You’ll cream the butter and sugar until very light, then gently fold in those whipped whites at the end. No rushing this part. And absolutely no aggressive stirring once the whites go in or you’ll knock out the air you just worked for.
The result: slices that feel light on your fork but still sturdy enough to hold the filling.
2. The fruit and nut “jewel” filling
Inside, the cake hides a rich mixture of chopped figs, raisins, and toasted nuts. Those little bits are soaked in sherry, brandy, or strong tea so they plump up and soften. Skipping the soak is the fastest way to a chewy, sticky middle.
Once they’re ready, you’ll fold the fruit and nuts into a portion of the frosting, which turns them into a spreadable filling instead of a chunky avalanche. It looks like confetti when you cut into the cake. My kids call it “treasure layer,” which honestly feels accurate.
Sweet, chewy, a little boozy (or tea-scented). That contrast against the pale cake is everything.
3. The classic boiled icing (seven-minute frosting)
On the outside, you’ve got old-fashioned seven-minute frosting: a cooked meringue made by whipping egg whites with hot sugar syrup over a double boiler. It sounds fussy, but it’s really just constant mixing and watching for glossy, stiff peaks.
This icing is ultra white, billowy, and just a bit sticky, like melted marshmallow that decided to behave. It’s sweeter than buttercream, which is why the cake and filling stay a little more restrained.
And the best part? Those big swoops and curls hide any uneven spots in your layers, so even if your stacking isn’t bakery-perfect, the finished cake still looks like a showpiece.
Ingredients & Substitutions
Here’s the good news: everything you need for this cake is pretty normal grocery-store stuff. No ordering rare Victorian ingredients. You’ll mostly be shopping the baking aisle and the dried fruit section.
I’ll walk you through each part plus the smart swaps, so you can build the most authentic version or tweak it for what you already have in the pantry.
Fruit and nut filling ingredients
For the “jewel box” center, you’ll need:
- Dried figs: They bring a deep, honeyed flavor and chewy texture. Turkish or Mission figs both work. Just trim the stems and chop them small so they slice cleanly.
- Raisins: Golden raisins look pretty, dark raisins are classic. Use what you like. If they’re very dry, the soak will fix that.
- Pecans or walnuts: Toasted first for maximum flavor. I usually toast a big batch on a sheet pan and keep extras for salads and snacking.
For soaking, you’ll use:
- Sherry or brandy for the traditional flavor.
- Or strong Earl Grey or black tea if you want a no-alcohol version that still tastes grown-up and aromatic.
You can also sneak in a spoonful of orange zest if you love a citrusy note. Totally optional, but nice.
White cake ingredients
For the layers, you’ll gather:
- Cake flour: Non-negotiable for that fine, tender crumb. If you only have all-purpose, you can make a DIY version by replacing a few tablespoons of flour with cornstarch, but true cake flour is best.
- Baking powder & salt: To lift and balance the sweetness.
- Unsalted butter: Room temperature, so it creams properly with sugar. Salted butter will work in a pinch; just reduce the added salt slightly.
- Granulated sugar: Superfine sugar dissolves easier, but regular works.
- Whole milk: Room temperature so it doesn’t shock the batter.
- Vanilla + almond extract: Almond is a classic “bakery” note in Lady Baltimore Cake, but if you hate almond, double the vanilla and skip it.
- Egg whites only: Six large whites, whipped to stiff peaks. Save the yolks for lemon curd or a Lord Baltimore Cake another day.
Everything should be at room temp before you start mixing. Cold ingredients are a fast track to dense cake.
Seven-minute frosting ingredients
For the billowy frosting, you’ll use:
- Granulated sugar
- Cold water
- Light corn syrup: Just a tablespoon to keep the sugar from crystallizing and turning grainy.
- Egg whites: Two large, preferably at room temp.
- Cream of tartar: Helps stabilize the meringue.
- Vanilla extract for flavor.
If you don’t have corn syrup, you can sometimes get away without it, but you’ll need to be extra careful not to splash sugar crystals up the sides of the bowl. I recommend using it if you can.
Alcohol-free and nut-free variations
If you’re skipping alcohol, you still want flavor. Strong brewed tea (Earl Grey or black), unsweetened grape juice, or even apple juice all work as the soak. Just avoid anything too sweet and mild, or the filling will taste flat.
For a nut-free version, you can leave out the pecans and add a little extra dried fruit instead. Chopped dried cherries or cranberries are fun. The cake will be less “classic,” but still beautiful and safe for nut-free guests.
And if you’re baking for kids, you can soak part of the fruit in tea or juice and the rest in sherry, then assemble one fully non-alcohol layer for them and the “grown-up” layers for everyone else. Quiet little compromise.
Step-by-Step Instructions
We’re going to build this in a few stages so nothing feels rushed or chaotic. Fruit first, cake second, frosting last, then assembly. If you can follow a brownie recipe, you’ve got this.
Have your pans prepped, ingredients measured, and mixer ready before you start the frosting. That part moves fast.
Soaking the fruit
Chop the figs and raisins into small bite-size bits and add them to a medium bowl with the chopped toasted nuts. Pour the sherry, brandy, or strong tea over the top and stir to coat everything.
Cover the bowl and let it sit at room temperature for at least 1 hour, stirring once or twice so every piece gets a turn in the soak. Longer is even better. Two hours is great. Overnight in the fridge is perfection.
By the time you’re ready to assemble, the fruit should look plump and feel softer, not tough or leathery.
Mixing the white cake batter
Preheat your oven to 350°F and grease and line three 8-inch round cake pans with parchment on the bottom. Set them aside.
In a medium bowl, sift together the cake flour, baking powder, and salt. Give it a quick whisk and set aside. In a large mixing bowl, beat the butter and sugar together on medium-high speed for 3 to 5 minutes until very light and fluffy. It should look almost pale and billowy.
Beat in the vanilla and almond extract. With the mixer on low, add the dry ingredients in three additions, alternating with the milk. Start and end with the flour, mixing just until each addition disappears. No overmixing.
In a clean bowl with clean beaters, whip the egg whites to stiff, glossy peaks. Gently fold the whites into the batter in two batches, using a spatula and light, sweeping motions. And stop folding as soon as there are no big streaks of egg white left.
Baking and cooling the layers
Divide the batter evenly among the three prepared pans. A kitchen scale makes this easy, but eyeballing works. Smooth the tops with a spatula.
Bake for 20 to 25 minutes, until the layers are lightly golden around the edges and a toothpick inserted in the center comes out clean or with just a few moist crumbs. The centers should spring back when lightly touched.
Let the cakes cool in the pans on a rack for about 10 minutes, then run a knife around the edges and turn them out. Peel off the parchment and let them cool completely on the rack. Totally cool. No warmth at all before frosting.
Making the meringue frosting
Once your layers are cool and your fruit is soaked and drained, make the frosting. In a heatproof mixing bowl (metal or glass), combine the sugar, water, corn syrup, egg whites, and cream of tartar.
Set the bowl over a pot of gently simmering water, making sure the bottom of the bowl does not touch the water. Beat with a hand mixer on high speed for about 7 minutes, or until the frosting is thick, glossy, and holds stiff peaks. The mixture should feel hot, and if you use a thermometer it should reach about 160°F.
Remove the bowl from the heat and continue beating for another minute or two off the heat to cool it slightly. Beat in the vanilla. The frosting should look like shiny marshmallow fluff that can hold swoops. Magic.
Assembly: the “dam” method to hold the filling
Drain any excess liquid from the fruit and nut mixture. In a small bowl, stir about one third of the finished frosting into the soaked fruit and nuts to make a thick, spreadable filling. It should look like chunky, glossy confetti.
Place the first cake layer on your serving plate. Pipe or spoon a ring of plain frosting around the outer edge to create a “dam.” This little wall keeps the filling from escaping. Spread half of the fruit filling inside the circle in an even layer.
Set the second layer on top and repeat with another frosting dam and the rest of the fruit filling. Finish with the third cake layer, bottom side up for a flat top.
Cover the top and sides of the cake with the remaining plain frosting, swirling it with a spatula or spoon for those classic billowy peaks. And if you like, decorate the top with a few whole pecans or a sprinkle of extra chopped nuts. Then slice, admire the layers, and serve.
Tips for Success
This isn’t a throw-it-together sheet cake, but it’s also not as high maintenance as it looks. A few small habits make the difference between “pretty good” and “everyone is texting you for the recipe.”
Think of this section as your friendly little insurance policy.
Avoiding a dry or dense cake
Dry Lady Baltimore is a tragedy. Luckily, it’s easy to avoid:
- Use cake flour, not all-purpose, whenever you can. That lower protein is what gives you a fine, tender crumb instead of something that feels like sweet cornbread.
- Bring everything to room temperature: butter, milk, and egg whites. Cold ingredients won’t blend as smoothly and can make the batter dense.
- Cream the butter and sugar long enough. You want it very pale and fluffy before you add anything else. That trapped air is free lift.
- Don’t overmix once the flour goes in. Mix just until you don’t see streaks of flour. Overmixing toughens the gluten.
- Bake just until done. Check a few minutes early. A toothpick with a few moist crumbs is better than one that’s bone dry.
If you’re nervous, you can brush the cooled layers very lightly with leftover soak liquid or simple syrup. Not soaked. Just gently refreshed.
Troubleshooting seven-minute frosting (grainy or runny)
This frosting has a reputation for being fussy, but most problems come from two things: sugar crystals and temperature.
Grainy frosting?
- That usually means the sugar crystallized. Make sure you:
- Use a clean bowl and beaters.
- Add a little corn syrup (it really does help).
- Avoid splashing sugar up the sides of the bowl as you mix.
- If it turns slightly grainy, keep beating over the heat a little longer. Sometimes it smooths out as the sugar fully dissolves.
Runny frosting that won’t hold peaks?
- It probably didn’t get hot enough or whipped long enough.
- Stay over simmering water until it’s thick, glossy, and holds stiff peaks, and the mixture is hot to the touch.
- If it’s still too soft after you remove it from the heat, keep beating off the heat for another minute or two.
And if all else fails and you have a somewhat soft frosting, stack the cake and chill it briefly. Cold helps it firm up for slicing.
Keeping the filling from sliding out
The filling is delicious. It also wants to escape. Here’s how to keep it in line:
- Drain the fruit well before mixing it with frosting. Too much liquid means slippery layers.
- Use enough frosting “dam.” Don’t be shy. Pipe or spoon a thick ring of plain frosting around the edge of each layer. That barrier is your best friend.
- Keep the filling layer thin. It should be a modest, even layer, not a mountain. Extra filling can be spooned over individual slices instead.
- Chill briefly after stacking. Once the cake is filled and stacked (before the final coat of frosting), you can chill it for 20–30 minutes to help everything set.
You’ll know you nailed it when you cut the first slice and the fruit layer stays put instead of squishing out the sides.
How to cut neat, clean slices
Tall, frosted cakes are notorious for messy slices, especially with a sticky meringue frosting. A few small tricks help:
- Use a long, sharp knife. A thin chef’s knife or carving knife works better than a short, chunky one.
- Wipe the blade between cuts. A quick wipe with a warm, damp cloth keeps frosting build-up from tearing the cake.
- Chill slightly before slicing. Let the finished cake sit at cool room temp for serving, but if it’s very soft, a 20–30 minute chill firms it up just enough for cleaner cuts.
- Cut straight down, not sawing. Press gently, then lift the slice out with a cake server or offset spatula.
Clean layers, visible “jewel” filling, big fluffy frosting swirls. That’s the Lady Baltimore moment you’re going for.
Storage and Make-Ahead Instructions
Here’s the tricky truth about Lady Baltimore Cake: the cake layers love being made ahead, but the frosting really doesn’t. Once you know that, planning is easy.
Think of it as a two-day project if you want zero stress.
Making the cake layers ahead
The white cake layers are very make-ahead friendly:
- Same day: You can bake them in the morning, cool completely, wrap in plastic, and assemble in the afternoon.
- Up to 2 days ahead: Once fully cooled, wrap each layer tightly in plastic wrap and then in foil. Store at room temperature in a cool, dry spot.
- For longer storage: Wrap as above and freeze for up to 2 months. Thaw, still wrapped, at room temperature before assembling.
Honestly, slightly chilled or just-thawed layers are easier to stack and trim, so this can actually make your life easier.
Making the filling ahead
The fruit and nut mixture actually improves as it sits:
- Soak ahead: Combine chopped fruit, nuts, and soak liquid, then cover and refrigerate for up to 24 hours.
- Before using, drain any excess liquid so it doesn’t make the filling runny.
Wait to mix the soaked fruit with the frosting until just before assembly. That’s when it turns into a spreadable filling.
When to make the frosting
Seven-minute frosting is a same-day situation. It tastes best and looks its fluffiest within a few hours of making it.
- Plan to cook and whip the frosting right before you assemble and frost the cake.
- It will hold at cool room temperature for several hours, but it doesn’t like long refrigeration or overnight storage on its own. It can deflate and weep.
How to store the finished cake
Once assembled and frosted, treat this cake gently:
- Short term (same day): Keep at cool room temperature for up to 6 hours. Avoid hot kitchens, direct sun, or sitting by the oven.
- Overnight: Because of the egg whites in the frosting and the fruit filling, it’s safest to refrigerate. Place the cake in a box or cover it loosely with a large cake dome so the frosting doesn’t get smashed.
Before serving from the fridge, let the cake sit at room temperature for 30 to 45 minutes so the texture softens again.
Can you freeze Lady Baltimore Cake?
Fully frosted, not really. The meringue-style icing doesn’t love the freezer and can turn rubbery or weepy as it thaws.
But you can absolutely freeze:
- The plain cake layers, well-wrapped.
- The soaked (but undrained) fruit and nuts in an airtight container.
Then, on the day you want to serve, you just thaw, whip the frosting, assemble, and enjoy.
Lady Baltimore Cake Printable Recipe Card
Classic Lady Baltimore Cake (Authentic Southern Recipe)
An elegant Southern Lady Baltimore Cake with tender white layers, a sherry-soaked fruit and nut “jewel box” filling, and fluffy seven-minute frosting. Perfect for holidays, teas, and weddings.
Ingredients
For the fruit and nut filling:
- 1/2 cup dried figs, stems removed and finely chopped
- 1/2 cup raisins (golden or dark), chopped
- 1/2 cup pecans or walnuts, toasted and chopped
- 1/3 cup sherry, brandy, or strong Earl Grey/black tea (for soaking)
- Optional: 1 teaspoon finely grated orange zest
For the white cake layers:
- 3 cups cake flour, sifted
- 1 tablespoon baking powder
- 1/2 teaspoon fine salt
- 1 cup unsalted butter, room temperature
- 1 1/2 cups granulated sugar
- 1 cup whole milk, room temperature
- 1 teaspoon vanilla extract
- 1/2 teaspoon almond extract
- 6 large egg whites, room temperature
For the seven-minute frosting:
- 1 1/2 cups granulated sugar
- 1/3 cup cold water
- 1 tablespoon light corn syrup
- 2 large egg whites
- 1/4 teaspoon cream of tartar
- 1 teaspoon vanilla extract
Instructions
- Make the fruit and nut filling: In a medium bowl, combine the chopped figs, raisins, and toasted nuts. Add the sherry, brandy, or strong tea (and orange zest, if using) and stir to coat everything well.
- Cover the bowl and let the fruit mixture soak at room temperature for at least 1 hour, stirring once or twice. For the best texture, refrigerate and soak for up to 2 hours or overnight.
- Prepare the pans and oven: Preheat the oven to 350°F (175°C). Grease three 8-inch round cake pans, line the bottoms with parchment paper, and lightly grease the parchment. Set aside.
- Mix the dry ingredients: In a medium bowl, sift together the cake flour, baking powder, and salt. Whisk to combine and set aside.
- Cream the butter and sugar: In a large mixing bowl, beat the butter and granulated sugar on medium-high speed for 3 to 5 minutes, until very light, pale, and fluffy.
- Add flavorings and milk: Beat in the vanilla and almond extract. With the mixer on low speed, add the dry ingredients in three additions, alternating with the milk in two additions. Start and end with the flour mixture, mixing just until each addition is incorporated.
- Whip the egg whites: In a clean bowl with clean beaters, whip the 6 egg whites on medium-high speed until they hold stiff, glossy peaks.
- Fold in the egg whites: Gently fold the whipped egg whites into the batter in two batches, using a spatula and light sweeping motions. Stop as soon as there are no visible streaks of egg white.
- Bake the layers: Divide the batter evenly among the three prepared pans and smooth the tops. Bake for 20 to 25 minutes, or until the edges are lightly golden, the centers spring back when touched, and a toothpick inserted in the center comes out clean or with a few moist crumbs.
- Cool the cakes: Let the cakes cool in the pans on a wire rack for 10 minutes. Run a knife around the edges, turn out the layers, remove the parchment, and cool completely on the rack.
- Drain the fruit: When you are ready to assemble, drain any excess soaking liquid from the fruit and nut mixture so it is moist but not dripping.
- Make the seven-minute frosting: In a large heatproof mixing bowl, combine the sugar, water, light corn syrup, egg whites, and cream of tartar. Set the bowl over a pot of gently simmering water, making sure the bottom of the bowl does not touch the water.
- Beat over heat: Using a hand mixer, beat the mixture on high speed for about 7 minutes, or until it becomes thick, glossy, and holds stiff peaks. The mixture should feel hot to the touch and reach about 160°F (71°C) if using a thermometer.
- Finish the frosting: Remove the bowl from the heat and continue beating for 1 to 2 minutes to cool slightly. Beat in the vanilla extract. The frosting should look like shiny marshmallow fluff that holds swoops.
- Make the filling: Transfer about one third of the finished frosting to a separate bowl. Stir in the drained fruit and nut mixture until evenly coated and spreadable.
- Start assembly: Place one cooled cake layer on a serving plate or cake stand. Spread a generous ring of plain frosting around the edge of the layer to create a “dam.”
- Add the filling: Spread half of the fruit-and-frosting filling inside the frosting dam in an even layer. Top with the second cake layer and repeat the dam and filling with the remaining fruit mixture.
- Add the top layer: Place the third cake layer on top, bottom side up for a flatter surface. Press gently to level the stack.
- Frost the cake: Use the remaining plain seven-minute frosting to cover the top and sides of the cake. Create soft swirls and peaks with an offset spatula or spoon for a billowy look.
- Garnish and serve: Decorate the top with a few whole pecans or extra chopped nuts if desired. Let the cake stand at cool room temperature for about 20 to 30 minutes, then slice and serve the same day for the best texture.
Notes
- For the best flavor and texture, soak the dried figs and raisins for at least 1 hour and up to overnight. Well-soaked fruit stays soft and doesn’t pull moisture out of the cake.
- Cake flour is strongly recommended for a tender, fine crumb. If you only have all-purpose flour, you can make a DIY version by replacing 2 tablespoons of each cup of all-purpose with cornstarch and whisking well.
- Make sure the butter, milk, and egg whites are at room temperature before mixing the batter. Cold ingredients can cause a dense cake.
- Whip the egg whites to stiff, glossy peaks and fold them in gently to avoid deflating the batter. Overmixing at this stage can make the cake heavy.
- Seven-minute frosting is easiest to work with right after it’s made. Have your cooled layers and filling ready before you start cooking the frosting.
- Grainy frosting usually means the sugar crystallized. Using light corn syrup and avoiding sugar splashes on the sides of the bowl helps keep the texture smooth.
- If the frosting seems too soft, keep beating over the heat until it holds stiff peaks and feels hot, then beat off the heat for another minute or two to set.
- To keep the filling from sliding out, always drain off excess soaking liquid and build a tall frosting “dam” around each layer before adding the fruit mixture.
- For extra stability and cleaner slices, chill the filled but unfrosted cake for 20 to 30 minutes before applying the final coat of frosting.
- Assembled Lady Baltimore Cake is best served the day it is frosted. Store at cool room temperature for up to 6 hours, then refrigerate loosely covered if holding longer.
- Refrigerated leftovers should be brought back toward room temperature for 30 to 45 minutes before serving so the cake and frosting soften.
- You can bake the cake layers up to 2 days ahead, wrap them tightly once cooled, and store at room temperature, or freeze them for up to 2 months.
- Alcohol-free versions work beautifully with strong brewed tea, grape juice, or apple juice as the soaking liquid for the fruit.
- To make the cake nut-free, omit the pecans or walnuts and replace them with additional dried fruit; the texture will change slightly but the cake will still be delicious.
Nutrition Information:
Yield: 14 Serving Size: 1 sliceAmount Per Serving: Calories: 390Total Fat: 16gSaturated Fat: 9gCarbohydrates: 57gSugar: 44gProtein: 5g
Nutrition values are estimates and will vary based on ingredients and brands.
Lady Baltimore Cake FAQs
You’ve baked the layers, whipped the frosting, maybe said a small prayer over the filling. Now all the little “but what about…?” questions start popping up. Let’s tackle them here so you don’t have to guess mid-bake.
Consider this your quick-reference section for next time too.
Love This Recipe? Discover More Classic Layer Cake Favorites
If this layer cake hit the spot, don’t miss The Ultimate Guide to Classic Layer Cakes where you’ll find more timeless flavors, smart frosting pairings, and easy fixes for every leaning, crumbly slice.