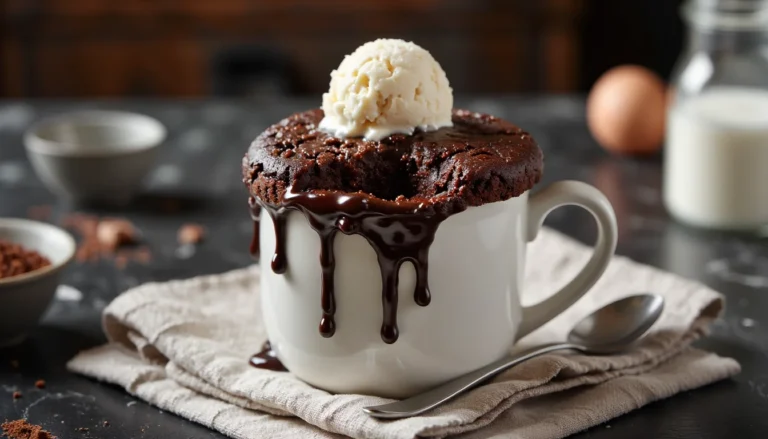
The Best Oreo Mug Cake (Better Than the TikTok Hack)
You know that moment when it’s way past dinner, you’re half-watching Netflix, and suddenly you “need something chocolate” more than you need sleep? That’s exactly when this Oreo-in-a-mug situation saves the night. No mixer. No preheating. Just you, a mug, and a handful of cookies.
You’ve probably seen the TikTok version where you drown Oreos in milk and nuke it. Fun to watch. Not so fun to eat when it turns out gummy and weirdly chewy. I tried it once after the kids went to bed and ended up sadly scraping rubbery cookie sludge out of my mug.
So I fixed it for us. This Oreo mug cake keeps the lazy vibe but adds a few pantry ingredients to turn that grayish sludge into a real, fluffy cake with a gooey center. Five minutes. One spoon. Zero sharing required.
Craving more cozy single-serve desserts? Head over to The Ultimate Guide to Mug Cakes for flavor ideas, timing tricks, and troubleshooting all in one place.
Why This Recipe Beats the 2-Ingredient Version
Let’s talk about that famous “Oreos + milk = cake” hack. It works in the sense that it becomes hot and vaguely cake-like. But texture-wise? It’s more like a thick pudding brick. The cookies soak up the milk, the sugar melts, and you end up with something dense, gummy, and a little sad once it cools.
Oreos are basically flour, sugar, fat, cocoa, and leavening already baked together. When you just crush them and add milk, you’re rehydrating a finished cookie, not building a fresh batter. There’s nothing in there to trap steam and create that soft crumb you expect from an actual cake.
So this version cheats in the best way. We still start with crushed Oreos, but we stir in a spoonful of flour and a pinch of baking powder. That tiny tweak gives the batter structure and lift. Suddenly your mug has room for air bubbles, and those bubbles mean fluffy, tender bites instead of heavy paste.
A splash of milk and a bit of oil (or melted butter) keep everything moist and rich. No dry edges. No rubbery center. And because we sink a whole Oreo or a chunk of chocolate in the middle, you get that molten, creamy pocket when you dive in with your spoon.
Same 5-minute effort. Totally different result. Real cake energy.
Ingredients You Need
The whole point of this Oreo mug cake is using things you already have. If you’ve got Oreos and a microwave-safe mug, you’re basically there.
The Cookies
You’ll need 5 Oreos total:
4 to crush into the batter, plus 1 whole Oreo for the molten center or for crumbling on top.
Regular or Double Stuf both work. Double Stuf just makes it a little sweeter and creamier. Use whatever’s in the pantry or half-open sleeve on the counter.
The Wet Ingredients
You only need a couple of tablespoons here.
- Milk: Whole milk gives the richest flavor, but 2%, almond, oat, or soy milk all work.
- Oil or melted butter: Just 1 tablespoon keeps the cake soft and moist. Oil is the easiest “I’m lazy” option. Melted butter adds a tiny bit of buttery flavor.
You’ll mix these right in the mug. No extra bowl to wash. Win.
The Dry Team
These are the little heroes that turn crushed cookies into real cake:
- All-purpose flour: A few tablespoons give structure so it bakes up fluffy.
- Baking powder: Just ½ teaspoon so the cake rises instead of staying flat and dense.
- Sugar: A teaspoon to bump the sweetness back up after adding flour.
- Cocoa powder (optional): For extra chocolatey, bakery-style vibes.
- Pinch of salt: Totally optional, but it makes the chocolate pop.
Equipment
Nothing fancy.
- Microwave-safe mug: At least 10 to 12 ounces so the batter has room to puff up without overflowing. Think standard coffee mug, not the tiny espresso one.
- Fork or small whisk: For crushing the cookies and mixing the batter.
- Microwave: Anywhere from 700–1100 watts; we’ll walk through timing so you don’t end up with a hockey puck.
How to Make It (Step-by-Step)
You’re about 5 minutes away from dessert. Here’s exactly what to do.
Step 1: Crush the Oreos
Grab a microwave-safe mug that holds at least 10–12 ounces. Drop 4 Oreos into the mug.
Use the back of a fork to press and crush them into fine crumbs. Keep going until there are no big chunks left. A few tiny pieces are fine. Huge chunks? Uneven baking.
If you prefer, you can crush them in a zip-top bag first, then pour the crumbs into the mug. Less mess on the counter. Same tasty result.
Step 2: Mix the Wet Ingredients
Pour in 3–4 tablespoons of milk and 1 tablespoon oil or melted butter.
Stir with your fork until the crumbs look like a loose, chocolatey sludge. Everything should be evenly moistened with no dry bits hiding at the bottom.
Step 3: Add the Dry Ingredients
Sprinkle in:
- 3 tablespoons flour
- 1 teaspoon sugar
- ½ teaspoon baking powder
- 1 teaspoon cocoa powder (optional)
- Tiny pinch of salt
Gently mix until you don’t see streaks of flour. Stop as soon as it’s combined. Overmixing can make the texture tough. The batter should be thick but pourable.
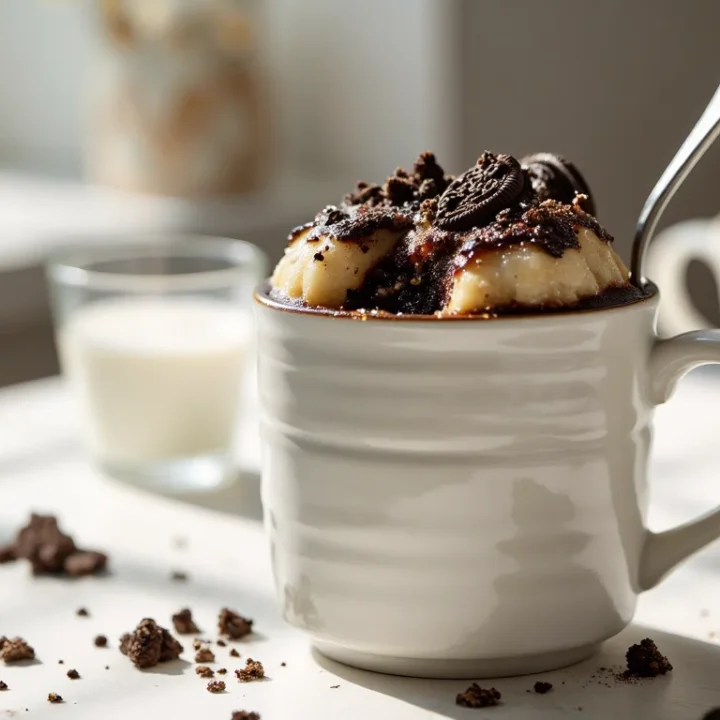
Step 4: Sink the Surprise Oreo / Chocolate
Press 1 whole Oreo right into the center of the batter.
You can also use a square of chocolate instead. Spoon a little batter over the top so it’s mostly covered. This is your molten, creamy pocket.
Step 5: Microwave & Check for Doneness
Microwave on High:
- Start with 60 seconds in a 900–1000W microwave.
- For lower wattage (around 700W), you may need 75–90 seconds.
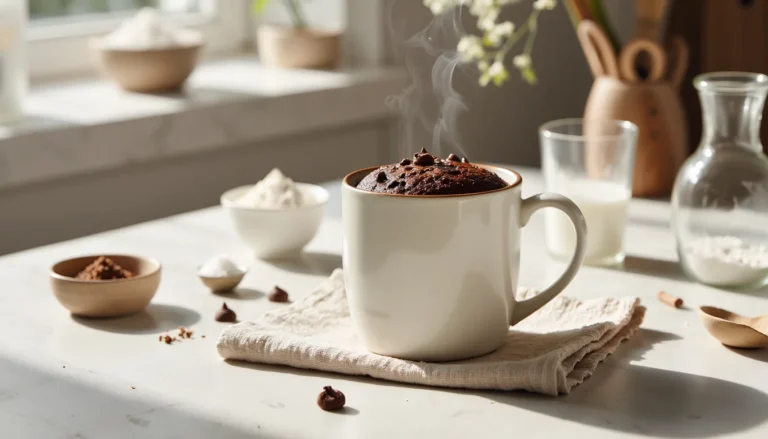
When it’s done, the top should look set around the edges but still slightly shiny in the center. Lightly tap it with your finger; it should feel soft and springy, not wet or jiggly.
If it still looks raw, add 10–15 second bursts, checking after each one. It’s better a little underbaked and gooey than dry and rubbery.
Let the mug cake stand for 1–2 minutes. It finishes cooking and cools from “lava” hot. Then grab a spoon, add ice cream or whipped cream if you want, and dig into that molten Oreo middle.
Secrets to the Perfect Molten Center
The line between “gooey lava” and “dry hockey puck” is…about 15 seconds. Honestly. The trick is to use your eyes and fingers, not just the timer.
For a rough timing guide:
- Around 700W: 75–90 seconds
- Around 900W: 60–75 seconds
- 1000–1100W: Start checking at 50–60 seconds
If you don’t know your microwave wattage, pretend it’s powerful and err on the shorter side. You can always add time. You can’t uncook a tough, rubbery mug cake.
Watch the top of the cake as it cooks. The edges should look puffed and set, while the very center still looks a bit shiny. Not soupy. Just slightly glossy. When you gently tap the top with a finger (careful, it’s hot), it should feel soft and spring back, like a sponge. If your finger sinks into wet batter, give it another 10 seconds.
That hidden whole Oreo or chocolate square does a lot of the molten magic. It melts inside the batter and keeps the center creamy even if the outside is fully baked. I’ve overcooked the edges before and still had a dreamy, soft pocket in the middle thanks to that little surprise.
And don’t skip the 1–2 minute rest. When the mug comes out, the cake is still bubbling-hot and finishing its last bit of cooking. Letting it stand sets the crumb around the edges while the center stays gooey. Too impatient? You’ll burn your tongue and miss the texture payoff.
So: short bursts, lots of peeking, and a quick touch test. Gooey center, guaranteed.
Variations & Flavors
Once you’ve nailed the classic Oreo mug cake, it’s dangerously easy to start “just testing” new flavors. Ask me how I know. One mug. Same base recipe. Tiny tweaks, totally different vibes.
Golden Oreo Mug Cake
Swap the chocolatey mood for pure vanilla cookie bliss.
Use Golden Oreos instead of regular and skip the cocoa powder in the batter. If you want extra vanilla flavor, stir in a tiny splash of vanilla extract (about 1/8 teaspoon).
The result is lighter in color, super sweet, and tastes a little like birthday cake in a mug. My kids call this the “breakfast one.” They’re wrong. But also not wrong.
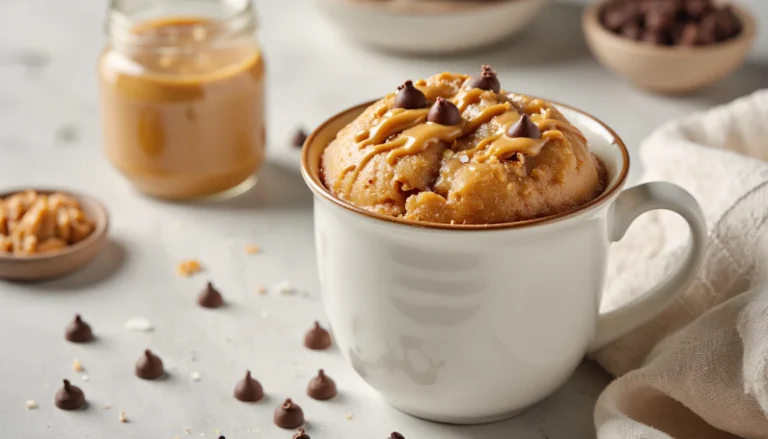
Peanut Butter Oreo Center
For a salty-sweet situation, grab the jar of peanut butter.
Make the batter as usual. Before microwaving, spoon 1 teaspoon of peanut butter into the center of the mug, right where you’d usually tuck the extra Oreo. You can still add the Oreo too: a dollop of PB on top of the cookie, then cover with batter.
It melts into a warm, gooey pocket that tastes like a peanut butter cup and cookies had a mug-baby. Ridiculously good.
Mint Chocolate Oreo Mug Cake
If you’re a Thin Mint or mint-chip ice cream person, this one’s yours.
Use Mint Oreos instead of original. Keep the cocoa powder in the batter for that deep chocolate flavor, and add a drop or two of peppermint extract if you have it. Go light; it’s strong.
Top the finished cake with whipped cream and a crushed Mint Oreo for a full-on restaurant-dessert feel. In pajamas. On your couch.
Vegan Oreo Mug Cake
Good news: Oreos are already vegan, so this is easy.
Use almond, soy, or oat milk instead of dairy milk and stick with neutral oil instead of butter. Everything else stays the same.
Microwave as usual, watching the timing so it stays moist in the center. Finish with a scoop of your favorite dairy-free ice cream or a cloud of coconut whipped cream. No one will guess it’s vegan unless you tell them.
Troubleshooting: Why Is My Mug Cake Hard or Gummy?
If your Oreo mug cake came out tough, gummy, or weirdly dry, don’t panic. You’re like…two tiny tweaks away from perfection next time.
Problem 1: It’s Dry or Hard
Biggest culprit? Overcooking.
Mug cakes keep cooking for a minute or two after you pull them out, so if you blast it for 90 seconds straight, it doesn’t stand a chance.
Next time:
- Start with less time and add 10–15 second bursts.
- Stop as soon as the top looks set but still a little shiny in the center.
- Let it sit for 1–2 minutes before digging in so the heat evens out.
Also check your liquid. If you used less milk than the recipe calls for, the batter will be too thick and bake up dry. You want a thick but spoonable batter.
Problem 2: It’s Gummy or Dense
Gummy usually means one of two things: overmixing or undercooked batter.
When you stir in the flour and baking powder, mix just until you don’t see streaks of dry ingredients. That’s it. No vigorous whisking. No trying to make it ultra-smooth. Overmixing develops gluten, which equals chewy, bouncy cake. Not in a good way.
If the texture is wet and gluey, it might also just be underdone dough. The top should be soft but not liquid. If your spoon pulls up raw batter from the bottom, give it another quick 10 seconds in the microwave.
Problem 3: It Overflowed Or Stayed Flat
Overflow usually means your mug is too small. You need at least a 10–12 oz mug so the cake can rise without climbing out like a lava monster.
If it stayed flat, check:
- Did you forget the baking powder?
- Is your baking powder super old? (If it’s been open for years, it might be weak.)
Fresh baking powder + the right mug size = puffy, fluffy cake instead of a sad puddle.
Oreo Mug Cake Printable Recipe Card
Fluffy Oreo Mug Cake (Ready in 5 Minutes)
A soft, fluffy Oreo mug cake you can make in minutes right in your microwave, with a gooey molten Oreo center and almost no dishes.
Ingredients
For the Oreo Mug Cake:
- 5 Oreo cookies, divided (4 for batter, 1 for center or topping)
- 3 to 4 tablespoons milk, dairy or plant-based
- 1 tablespoon vegetable oil or melted butter
- 3 tablespoons all-purpose flour
- 1 teaspoon granulated sugar
- 1/2 teaspoon baking powder
- 1 teaspoon unsweetened cocoa powder (optional, for extra chocolate flavor)
- Small pinch of salt (optional, but recommended)
Toppings:
- Whipped cream, ice cream, or chocolate sauce, for serving (optional)
- Extra crushed Oreos, for garnish (optional)
Instructions
- Choose a microwave-safe mug that holds at least 10 to 12 ounces to give the cake room to rise without overflowing.
- Add 4 Oreo cookies to the mug and crush them thoroughly with the back of a fork until they are fine crumbs with no big chunks.
- Pour in 3 tablespoons of milk and 1 tablespoon of oil or melted butter, then stir with the fork until all the crumbs are evenly moistened and look like a loose, chocolatey paste.
- Add the flour, sugar, baking powder, cocoa powder (if using), and a small pinch of salt to the mug.
- Gently stir until the dry ingredients are fully incorporated and no streaks of flour remain, stopping as soon as the batter looks smooth and thick but still spoonable. If it seems very stiff, stir in up to 1 extra tablespoon of milk.
- Press the remaining whole Oreo cookie straight down into the center of the batter, or tuck in a square of chocolate instead, and spoon a little batter over the top so it is mostly covered.
- Microwave the mug cake on High for 50 to 60 seconds in a powerful 900 to 1000 watt microwave, or about 70 to 90 seconds in a lower wattage microwave, watching closely near the end.
- Check for doneness: the edges should look puffed and set while the center looks slightly shiny but not wet, and the top should feel soft and spring back lightly when tapped.
- If the top is still very wet or jiggly, microwave again in 10 to 15 second bursts, checking after each one so you do not overcook the cake.
- Carefully remove the mug from the microwave and let the cake stand for 1 to 2 minutes so it finishes cooking and cools from lava-hot.
- Top with whipped cream, ice cream, chocolate sauce, and extra crushed Oreos if you like, then serve warm and enjoy straight from the mug.
Notes
- Use a 10 to 12 ounce mug so the batter has space to rise without spilling over the sides.
- Microwaves vary, so think of the cook time as a range and rely on the look and feel of the cake as your main guide.
- For a gooey, molten center, stop the microwave as soon as the edges are set and the middle is still slightly glossy, and always tuck a whole Oreo or a piece of chocolate into the center before cooking.
- To make this Oreo mug cake vegan, use plant milk (such as almond, oat, or soy) and stick with neutral oil instead of butter; Oreos themselves are already made without dairy ingredients.
- Try fun variations like Golden Oreos with no cocoa for a vanilla cake vibe, a teaspoon of peanut butter spooned into the center for a salty-sweet surprise, or Mint Oreos plus a drop of peppermint extract for a mint chocolate version.
- This is a make-and-eat-now dessert; mug cakes dry out quickly as they cool, so plan to enjoy it within about 10 to 15 minutes of cooking.
- For a quick premix, combine the dry ingredients in a small jar (flour, sugar, baking powder, cocoa, and salt), then when a craving hits, just add crushed Oreos, milk, and oil straight into your mug.
Nutrition Information:
Yield: 1 Serving Size: 1 MugAmount Per Serving: Calories: 250Total Fat: 26gSaturated Fat: 8gCarbohydrates: 68gSugar: 36gProtein: 6g
Nutrition values are estimates and will vary based on ingredients and brands.
Frequently Asked Questions (FAQ)
Love This Recipe? Discover More Mug Cake Favorites
If this mug cake hit the spot, don’t miss The Ultimate Guide to Mug Cakes. Inside you’ll find small-batch classics, over-the-top flavor combos, and quick fixes for every rubbery or overflowed mug moment. From brownie-style chocolate to bright lemon and gooey cookie dough, there’s a microwave treat for every craving.