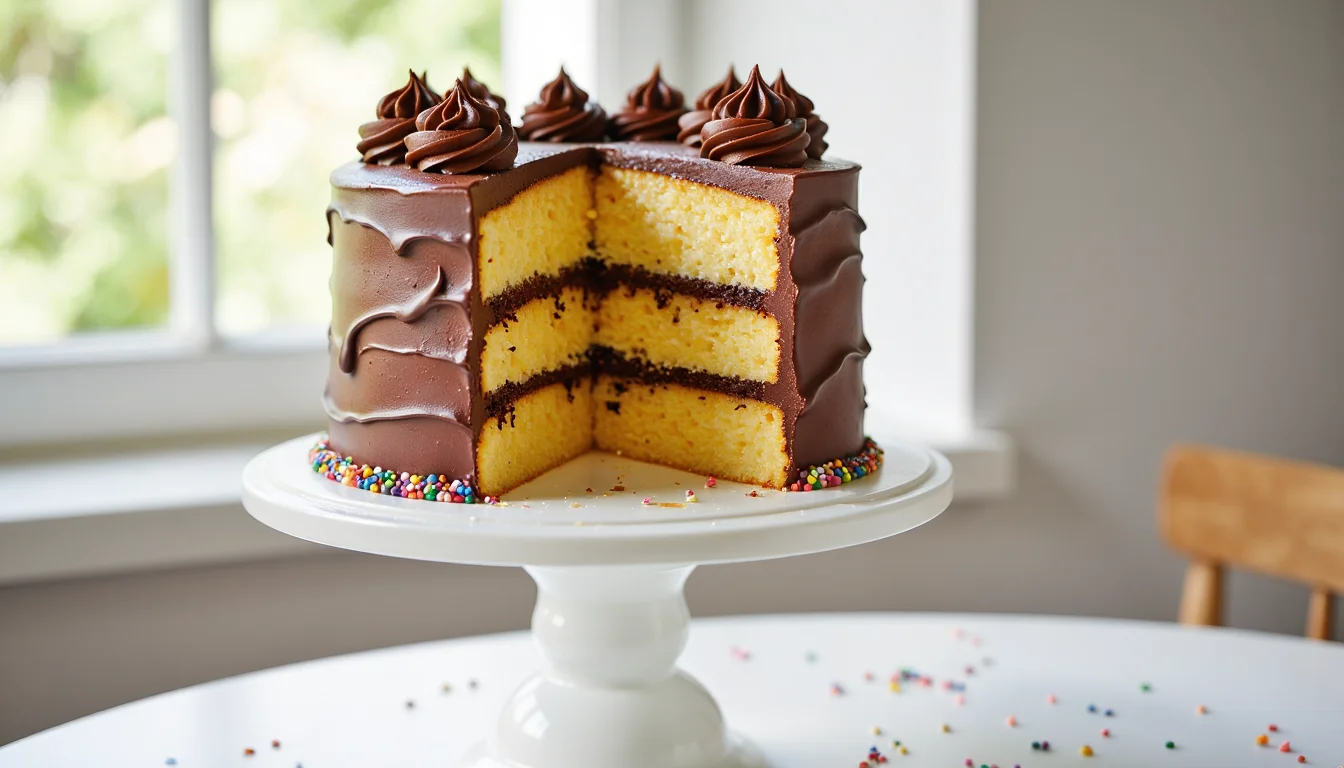
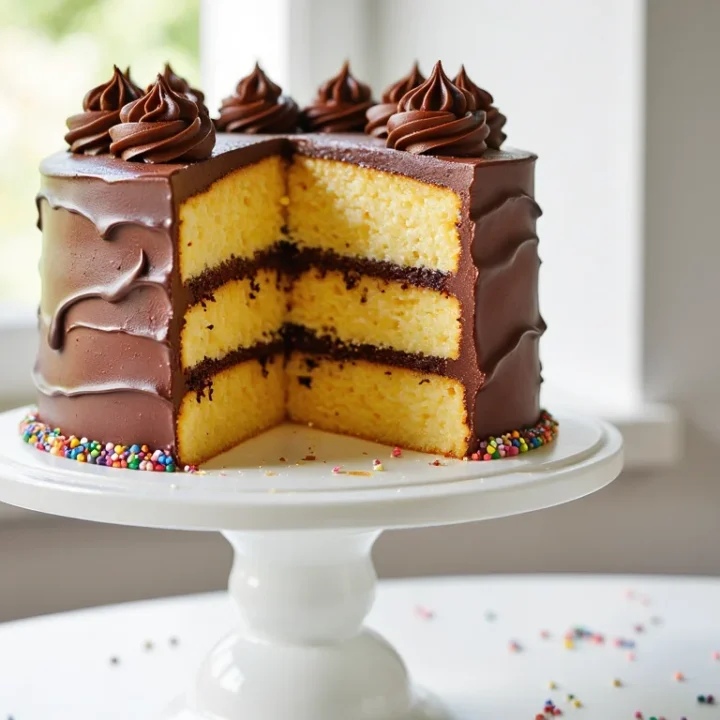
The Best Moist Yellow Cake Recipe (From Scratch)
Why This Is The Last Yellow Cake Recipe You’ll Ever Need
Picture this: it’s 8:15 pm the night before a birthday, your sink is already full of dishes, and you’re praying the cake in the oven doesn’t come out dry. I’ve been there, watching through the oven door like it’s a high-stakes movie. One crumbly slice and the whole celebration feels… meh.
This version fixes that. Every part of this cake is built around one promise: soft, moist slices for days, even after a night in the fridge. It has the melt-in-your-mouth texture of a box mix, but the flavor is pure “Grandma’s kitchen” with real butter, egg yolks, and good vanilla. No mystery ingredients. No weird aftertaste.
And the best part? You’re not guessing. You’ll know exactly why it stays tender, what each ingredient is doing, and how to avoid the usual birthday disasters like domed tops, dry edges, or gummy centers. Science plus nostalgia. Worth it.
Craving more tall, bakery-style cakes? Head over to The Ultimate Guide to Classic Layer Cakes for step-by-step stacking tips, crumb coat secrets, and seven must-bake classics.
The Hybrid-Fat Method: Butter + Oil = Never-Dry Cake
Most classic cakes pick a side: all butter or all oil. Butter gives you that dreamy flavor but can turn the crumb firm and dry once it cools. Oil keeps things moist, but the taste is flatter. So we steal the best from both.
In this batter, butter does the flavor work and helps whip in air during creaming, which makes the crumb light. A smaller amount of neutral oil slips between the starches in the flour and keeps them from tightening up, so the cake stays soft and plush even on day three. You get slices that feel tender at room temp and straight from the fridge.
It’s the little cheat code I wanted when I was wrapping leftover birthday cake in plastic wrap at midnight, hoping it wouldn’t turn into a brick by morning. Now it doesn’t.
Yellow Cake vs White Cake vs Vanilla Cake
Quick cheat sheet, because the names are confusing.
White cake is all about a pale, snowy crumb. It usually skips yolks and sometimes uses clear vanilla, so the color stays almost white and the flavor is a bit lighter.
Yellow cake leans into richness. Whole eggs plus extra yolks, real butter, and golden vanilla give it that sunny color and deeper, almost custardy flavor. No food coloring needed. Just eggs and butter doing their thing.
And vanilla cake? That’s the umbrella term. Any cake where vanilla is the main flavor can be called vanilla cake, but not all of them are true “yellow” cakes. Here, you’re getting the classic American birthday style: rich yellow crumb, strong vanilla flavor, and a big swoop of chocolate frosting on top.
Key Ingredients For A Tender, Moist Crumb
When you strip away the sprinkles and birthday candles, this cake comes down to a few power players working together. Each one has a job. If you’ve ever pulled a dry, bland slice out of the oven, it’s usually because one of these wasn’t doing its job properly.
We’ll walk through the MVPs so you know exactly what’s happening in your bowl, not just blindly following a yellow cake recipe and hoping for the best.
What Makes Yellow Cake Yellow?
Short answer: egg yolks and butter. That’s it.
Those extra yolks bring fat, color, and flavor. They act almost like a built-in custard, giving the crumb a deeper yellow tone and a velvety texture. No food coloring, no weird tinge. Just eggs.
Butter finishes the job. Good quality, real butter has natural pigments that warm up the color and make each slice look like it belongs on a bakery stand. When my kids see that golden edge around the layers, they know it’s the “birthday cake” cake.
Ingredient Breakdown (Butter, Oil, Buttermilk, Egg Yolks)
- Butter: Brings rich flavor and helps trap air during the creaming step. That air is what turns into a fine, fluffy crumb in the oven.
- Oil: Neutral oil (like canola or vegetable) sneaks in moisture insurance. It stays liquid when cold, so the cake doesn’t go firm or dry overnight. Tiny amount, big impact.
- Buttermilk: This is your tenderness booster. Its acidity weakens some of the gluten bonds in the flour, so the crumb bakes up soft instead of chewy. It also reacts with baking soda for extra lift.
- Eggs + Extra Yolks: Whole eggs provide structure, but the added yolks are where the magic happens. More fat. More emulsifiers. More color. They help the batter hold onto liquid, which keeps each slice moist instead of crumbly.
And of course there’s cake flour, which has a lower protein content than all-purpose. Less protein means less gluten, which means a fine, soft crumb instead of a bready one.
Substitutions & Hacks (DIY Buttermilk + Cake Flour From AP Flour)
Don’t panic if you’re out of buttermilk or cake flour. You’ve got options.
For DIY buttermilk, add 1 tablespoon of white vinegar or lemon juice to a measuring cup, then fill to the 1-cup line with milk. Let it sit for 5–10 minutes until it looks slightly thick and curdled. Or whisk a spoonful of sour cream into regular milk for a similar tangy effect.
For cake flour from all-purpose, measure 1 cup of all-purpose flour, remove 2 tablespoons, and replace them with 2 tablespoons of cornstarch. Whisk or sift really well so there are no streaks. I’ve done this on busy weeknights when I refuse to make another store trip, and the texture still comes out beautifully soft.
Use these hacks and you still get that plush, bakery-style crumb without needing a specialty pantry.
Step-by-Step: How To Make Yellow Cake From Scratch
Once you’ve made this a couple of times, it feels almost automatic. The key is getting the early steps right, before the batter even hits the pans. After that, the oven does most of the work.
Preparing Your Pans & Batter Basics
Preheat your oven to 350°F and move the rack to the center. That alone fixes a lot of uneven baking issues. Grease two 8- or 9-inch round pans, line the bottoms with parchment, then grease and lightly flour the parchment and sides. No parchment = stuck cake = tears.
In a medium bowl, whisk together your dry ingredients: cake flour, baking powder, baking soda, salt (and cornstarch if you’re using the AP-flour hack). Whisking aerates everything so it blends smoothly into the batter later.
Make sure your butter, eggs, and buttermilk are truly room temperature. Not chilly. Not melted. When I rush this step, the batter always fights me and looks curdled.
Creaming Butter, Oil & Sugar (Without Overmixing)
Add the softened butter and oil to the bowl of a stand mixer fitted with the paddle attachment (or use a large bowl and hand mixer). Beat on medium-high until they look smooth and combined.
Pour in the sugar and continue beating for 3 to 5 minutes, scraping down the bowl once or twice. The mixture should look pale and fluffy, almost like frosting. That means you’ve whipped in enough air to give the cake lift.
Stop here. More is not better. If you keep beating, the butter can start to warm up too much and the structure gets greasy instead of airy.
Adding Eggs The Right Way
Turn the mixer to medium-low. Add the whole eggs one at a time, letting each one fully mix in before adding the next. Then add the extra yolks and vanilla.
If the mixture looks a bit separated, don’t panic. Pause and scrape down the bowl, getting into the bottom where butter likes to hide. Beat for another 15–20 seconds until everything looks smooth and glossy again. You’re building an emulsion here, so patience pays off.
Alternating Dry & Wet Ingredients
Switch the mixer to low. Add about one-third of the flour mixture, then half of the buttermilk. Let it just combine. Add another third of the flour, the rest of the buttermilk, then the final flour.
As soon as the last streak of flour disappears, stop the mixer. Overmixing at this point is where cakes go from tender to tough. Use a spatula to gently fold the batter a few times, making sure there are no pockets of dry ingredients stuck to the bottom. The batter should be smooth, thick, and silky.
Divide it evenly between your prepared pans (a kitchen scale makes this painless) and smooth the tops.
Baking Times For 8-inch, 9-inch & 9×13 Sheet Cake
Bake on the center rack until the tops are lightly golden and the centers spring back when gently pressed. A toothpick inserted in the center should come out with a few moist crumbs, not wet batter. Smells like heaven when it’s close.
Approximate baking times:
- Two 8-inch round pans: 25–30 minutes
- Two 9-inch round pans: 22–27 minutes
- One 9×13 sheet pan: 30–35 minutes
Let the cakes cool in the pans for 10–15 minutes. Then run a thin knife around the edges, flip onto a wire rack, peel off the parchment, and let them cool completely. Warm yellow cake is fragile. Give it time to set before you bring in the frosting.
The Perfect Chocolate Buttercream Pairing
Yellow cake without chocolate frosting feels like a party without music. Technically fine, but why would you? This buttercream is thick, fudgy, and just soft enough to swoop into big, dramatic swirls. It holds its shape on a warm kitchen counter but still melts into the cake as you eat it.
We use a classic American-style buttercream upgraded with heavy cream and plenty of cocoa powder. No cooking, no thermometer, just a mixer and a big bowl of chocolate fluff.
Ingredients & Texture
You will need soft unsalted butter, unsweetened cocoa powder, powdered sugar, a pinch of salt, vanilla, and heavy cream. That is it.
First, the butter gets whipped until it is creamy and light. This step matters. Fluffy butter means fluffy frosting. Then the cocoa and powdered sugar go in gradually so you do not get a chocolate dust cloud over your counter. Add vanilla and a splash of heavy cream and let the mixer work for a few minutes until everything looks silky and smooth.
The texture should be spreadable but not runny. If it is too thick, add another spoonful of cream. Too soft? Beat in a little more powdered sugar. I like mine just firm enough that a spoon dragged through the bowl leaves a soft canyon behind.
How To Frost Smooth Layers (Or Keep It Rustic)
Make sure your cake layers are completely cool, or even slightly chilled. Cold cake, cool frosting. That combo is the secret to neat edges.
Set one layer on your serving plate. Add a generous scoop of frosting and spread it to the edges. Top with the second layer, bottom side up for a flat surface. Do a thin “crumb coat” all over to trap stray crumbs, then chill the cake for 15 minutes.
After that, finish with a thicker layer of buttercream and smooth it with an offset spatula, or keep it casual and make big swoopy swirls. A handful of sprinkles or chocolate curls on top and it suddenly looks like a bakery cake your family will swear came from a box. In the best way.
Expert Tips To Avoid Dry, Dense Cake
Here’s the truth: most “failed” yellow cakes are not bad recipes. They are tiny technique issues that gang up on you. Too much flour. Cold ingredients. Overbaking “just to be safe.” I’ve done all of it.
Use these as your non-negotiables and your cake suddenly feels very bakery-level, very on purpose.
Common Beginner Mistakes With Yellow Cake
Scooping flour from the bag. This is the number one dryness culprit. Scooping packs flour tightly into the cup so you end up with way more than the recipe intends. Use a kitchen scale whenever you can, or spoon flour into the cup and level it with a knife. No digging the cup straight into the bag.
Cold ingredients. If your butter, eggs, or buttermilk are chilly, they will not blend smoothly. The batter can look curdled, and the cake can bake up dense. Aim for cool room temperature: butter soft enough to press a finger into, eggs that do not feel cold to the touch, milk that is not straight-from-the-fridge icy.
Overmixing once the flour goes in. Remember, flour plus liquid plus motion equals gluten. You want just enough mixing to combine everything, not to build bread dough. Once you add the dry ingredients, keep the mixer on low and stop as soon as the streaks disappear. Then gently fold by hand. Two or three folds, not twenty.
Forgetting to scrape the bowl. Butter loves to hide at the bottom and along the sides of the mixing bowl. If you never scrape down, you end up with pockets of greasy, dense batter. Pause several times during mixing to drag a spatula along the bottom and sides so everything is evenly combined. Simple fix. Big payoff.
Baking too long. “Just one more minute” turns into dry edges really fast. Trust the doneness cues more than the timer.
How To Tell When Your Cake Is Done
You have three easy tests. Use them together.
- Look: The cake should be lightly golden and starting to pull away from the sides of the pan. The top will look set, not shiny or jiggly in the center.
- Touch: Gently press the center of the cake with a fingertip. It should spring back instead of leaving a dent. If it feels squishy or wet under the surface, give it another couple of minutes.
- Toothpick: Insert a toothpick into the center. You want a few moist crumbs clinging to it, not completely clean and not streaked with wet batter. Totally clean can mean you are already a bit past peak moistness.
Once it passes the tests, take it out. Let the layers cool in the pans for about 10–15 minutes so the structure can set, then turn them out onto a wire rack to cool completely. No rushing, no cutting into hot cake “just to check.” That rest time keeps your yellow cake tender instead of crumbly.
Storage, Freezing & Birthday Party Timeline
You’ve baked the cake, your kitchen smells like a bakery, and now the clock is ticking. Good news: this yellow cake is built to stay moist for days, so you can actually work ahead and not be frosting at 1 am in your pajamas.
Make-Ahead Schedule (Day 1–3)
Here’s an easy birthday timeline that keeps everything low stress:
Day 1: Bake the layers.
Bake your cake, let the layers cool completely, then wrap each one tightly in plastic wrap. You can keep them at room temperature for up to 24 hours if your kitchen is cool, or pop them in the fridge if it’s warm. The hybrid butter + oil combo keeps them from drying out.
Day 2: Frost and decorate.
Unwrap your layers and, if they’ve been chilled, let them sit for about 10–15 minutes so the chill comes off the surface. Frost the cake, add sprinkles or candles, and transfer it to a cake stand or storage container with a lid. Keep it at cool room temperature for the day, or refrigerate if your frosting is very soft.
Day 3: Serve and enjoy.
This cake is still wonderfully moist on day three, especially if it’s been covered. If you refrigerated it, let it sit out for 30–60 minutes before slicing so the butter in the cake and frosting can soften again. Nobody wants cold, stiff birthday cake.
You can also stretch this schedule: baked layers can be frozen for weeks, then thawed and frosted closer to party day.
How To Freeze Cake Layers
Freezing is your secret weapon. It actually makes the layers easier to handle and frost.
- Let the baked layers cool completely on a wire rack. No warmth left at all.
- Wrap each layer tightly in plastic wrap, then again in foil or place them in a large zip-top freezer bag. Label with the date so you don’t forget what’s what.
- Freeze for up to 2 months. The oil in the batter helps them thaw without going dry or crumbly.
When you’re ready to assemble, move the wrapped layers from the freezer to the fridge and let them thaw overnight, or leave them on the counter for about 1–2 hours. Keep them slightly chilled while you frost; cold layers are sturdier and shed fewer crumbs.
If you need to freeze the fully frosted cake, chill it uncovered until the frosting is firm, then wrap loosely in plastic or place in a cake box. Thaw in the fridge, then bring to room temp before serving. Still moist. Still birthday-level good.
Yellow Cake Printable Recipe Card
The Best Yellow Cake with Chocolate Frosting
This classic yellow cake is incredibly moist, buttery, and tender thanks to a smart butter-and-oil method, and it’s finished with a rich, fudgy chocolate buttercream perfect for birthdays.
Ingredients
For the Yellow Cake:
- 2 1/2 cups (285 g) cake flour, spooned and leveled
- 2 1/2 teaspoons baking powder
- 1/2 teaspoon baking soda
- 1/2 teaspoon fine sea salt
- 3/4 cup (170 g) unsalted butter, room temperature
- 1/4 cup (60 ml) neutral oil (canola or vegetable)
- 1 3/4 cups (350 g) granulated sugar
- 3 large eggs, room temperature
- 2 large egg yolks, room temperature
- 1 tablespoon pure vanilla extract
- 1 1/4 cups (300 ml) full-fat buttermilk, room temperature
For the Chocolate Buttercream:
- 1 cup (226 g) unsalted butter, room temperature
- 3 1/2 cups (420 g) powdered sugar, sifted
- 3/4 cup (65 g) unsweetened cocoa powder
- 1/4 teaspoon fine sea salt
- 2 teaspoons pure vanilla extract
- 1/4 cup (60 ml) heavy cream, plus more as needed
Instructions
- Preheat the oven to 350°F (175°C). Grease two 8- or 9-inch round cake pans, line the bottoms with parchment paper, then grease and lightly flour the parchment and sides.
- In a medium bowl, whisk together the cake flour, baking powder, baking soda, and salt until well combined. Set aside.
- In a large mixing bowl or stand mixer fitted with the paddle attachment, beat the softened butter and oil together on medium-high speed until smooth and creamy.
- Add the granulated sugar and beat on medium-high speed for 3 to 5 minutes, scraping down the sides and bottom of the bowl once or twice, until the mixture is very light and fluffy.
- Reduce the mixer speed to medium-low. Add the eggs one at a time, mixing well after each addition, then add the extra yolks and vanilla. Stop and scrape down the bowl, then mix again briefly until the batter looks smooth and emulsified.
- With the mixer on low speed, add one-third of the flour mixture, followed by half of the buttermilk. Mix just until combined, then add another third of the flour, the remaining buttermilk, and finally the last third of flour.
- As soon as the last streak of flour disappears, stop the mixer. Use a spatula to gently fold the batter a few times, scraping along the bottom of the bowl to make sure everything is evenly mixed without overworking the gluten.
- Divide the batter evenly between the prepared pans (a kitchen scale helps) and smooth the tops with a spatula. Tap the pans lightly on the counter to release any large air bubbles.
- Bake on the center rack until the tops are lightly golden and the centers spring back when gently pressed, 25 to 30 minutes for 8-inch pans or 22 to 27 minutes for 9-inch pans. A toothpick inserted in the center should come out with a few moist crumbs, not wet batter.
- Let the cakes cool in the pans for 10 to 15 minutes. Run a thin knife around the edges, then invert onto a wire rack, peel off the parchment, and let the layers cool completely before frosting.
- To make the chocolate buttercream, beat the room-temperature butter on medium-high speed until smooth and creamy, 2 to 3 minutes.
- Add the cocoa powder, powdered sugar, and salt in 2 or 3 additions, mixing on low speed at first so it does not puff out of the bowl, then increasing to medium until combined.
- Add the vanilla and heavy cream, then beat on medium-high speed for 2 to 3 minutes, scraping the bowl as needed, until the frosting is fluffy and spreadable. If it is too thick, add a splash more cream; if too soft, mix in a little more powdered sugar.
- To assemble, place one cake layer on a serving plate or cake stand. Spread a generous layer of chocolate buttercream over the top, then place the second layer on top, bottom side up for a flat surface.
- Apply a thin crumb coat of frosting over the top and sides of the cake and chill for about 15 minutes. Finish with a thicker layer of buttercream, smoothing with an offset spatula or leaving rustic swirls. Decorate with sprinkles or chocolate curls if desired.
Notes
- For a cake flour substitute, measure 1 cup all-purpose flour, remove 2 tablespoons, and replace them with 2 tablespoons cornstarch, then whisk well; repeat for each cup needed.
- Make DIY buttermilk by adding 1 tablespoon white vinegar or lemon juice to a measuring cup, then filling to the 1-cup line with milk and letting it sit for 5 to 10 minutes.
- All ingredients for the batter (butter, eggs, buttermilk) should be at cool room temperature for a smooth, emulsified batter and a tender crumb.
- To bake as a 9x13-inch sheet cake, pour the batter into a greased and parchment-lined pan and bake at 350°F (175°C) for 30 to 35 minutes, or until the center springs back and a toothpick comes out with moist crumbs.
- To make cupcakes, line a standard muffin pan with paper liners, fill each two-thirds full, and bake at 350°F (175°C) for 18 to 22 minutes; the recipe yields about 24 cupcakes.
- Store the frosted cake covered at cool room temperature for up to 2 days or in the refrigerator for up to 4 days; bring to room temperature before serving for the best texture.
- Unfrosted cake layers can be wrapped tightly in plastic and frozen for up to 2 months; thaw in the refrigerator, then bring to slightly chilled before frosting.
- For a funfetti version, gently fold 1/2 to 2/3 cup rainbow sprinkles into the finished batter at the very end, just before pouring into pans.
- Use visual doneness cues as well as the timer: lightly golden edges, a center that springs back when touched, and a toothpick with a few moist crumbs.
Nutrition Information:
Yield: 12 Serving Size: 1 sliceAmount Per Serving: Calories: 520Total Fat: 26gSaturated Fat: 15gCarbohydrates: 68gSugar: 47gProtein: 6g
Nutrition values are estimates and will vary based on ingredients and brands.
Yellow Cake FAQ
Love This Recipe? Discover More Classic Layer Cake Favorites
If this layer cake hit the spot, don’t miss The Ultimate Guide to Classic Layer Cakes where you’ll find more timeless flavors, smart frosting pairings, and easy fixes for every leaning, crumbly slice.