The Best Moist Lemon Layer Cake with Lemon Curd
Why This Is The Lemon Layer Cake Everyone Asks For
Picture a sunny Saturday, you’re juggling laundry, texts about who’s bringing what to brunch, and a serious craving for something bright and buttery. That’s exactly when I pulled this cake out of the oven for the first time, and my kids literally hovered waiting for the frosting bowl. It’s the kind of dessert that looks like you fussed for hours, but the steps are simple and repeatable.
You get three soft, bakery-style layers that actually stay moist for days, thanks to a combo of butter, oil, and tangy buttermilk. No dry, crumbly “lemon-ish” situation. Real lemon flavor comes from rubbing fresh zest into the sugar so every bite tastes sunny and sharp, not fake or faint.
Then there’s the filling. A bright ribbon of lemon curd tucked between each layer, held in by a creamy lemon cream cheese buttercream dam so nothing oozes out when you slice. Clean layers. Tall slices. Happy people.
And because everything is broken into clear steps (cake, frosting, assembly), you can spread the work over a couple of days or knock it out in one afternoon. Special-occasion pretty. Weeknight-manageable.
Craving more tall, bakery-style cakes? Head over to The Ultimate Guide to Classic Layer Cakes for step-by-step stacking tips, crumb coat secrets, and seven must-bake classics.
The Secret To A Super Moist Lemon Layer Cake
Dry lemon cake is personal for me. I’ve made the kind that looks gorgeous, then crumbles like cornbread on the plate. Not fun. So this version is built around three moisture “insurance policies”: butter, oil, and tangy dairy.
Butter brings that rich, nostalgic flavor and helps the cake set up with a fine, tight crumb. Oil is the quiet hero. It stays liquid even when the cake is chilled, so the texture stays soft on day two and three instead of turning firm and bready. You really do need both.
Then there’s the dairy. Buttermilk and a bit of sour cream add gentle tang and extra fat, which translates into tenderness. They also react with the leavening to give you height without dryness. One bowl of batter, very big payoff.
And we can’t forget the lemon flavor itself. Instead of just tossing zest into the batter, you rub it into the sugar first. The sugar pulls out the fragrant oils, turning it pale yellow and almost damp. Smells like a whole lemon grove. That infused sugar is what makes this lemon layer cake taste bright all the way through, not just in the frosting.
Last little secret: temperature. Room temperature butter, eggs, and dairy blend into a silky, stable batter. Cold ingredients can cause curdling, tunneling, and random dryness. I like to set everything out before school drop-off so it’s ready to go when I preheat the oven. Tiny habit, huge difference.
Key Ingredients & Easy Substitutions
The ingredient list looks long at first glance, but most of it is pantry stuff you probably already own. And once you know what each piece does, it’s much easier to make smart swaps without ruining the texture.
Flour: Cake Flour vs All-Purpose
Cake flour is my first “non-negotiable” for a soft, fine crumb. It’s milled extra fine and has less protein, which means less gluten and a more tender bite. If you only have all-purpose flour, you can hack it: measure 1 cup of AP flour, remove 2 tablespoons, and replace those with 2 tablespoons cornstarch, then whisk very well. Not perfect, but close.
Whatever you use, fluff, spoon into the cup, and level. Or better yet, weigh it. Too much flour is the fastest way to turn a dreamy cake into a dry sponge.
Fresh Lemons: Zest, Juice & Optional Extract
Fresh lemons do almost all the heavy lifting here. The zest carries those fragrant oils, which is why we massage it into the sugar first. The juice adds tang, but it’s more about acidity than aroma. Bottled juice in a pinch is ok in the batter, but I’d never skip fresh zest. That’s where the “wow, this is actually lemony” moment comes from.
If you love an extra-strong citrus punch, you can add a tiny splash of pure lemon extract, but keep it light or it can taste fake fast.
Dairy: Buttermilk, Sour Cream & Simple Swaps
Buttermilk keeps the crumb tender and reacts with baking soda for lift. If you’re out, mix just under 1 cup whole milk with 1 tablespoon lemon juice and let it sit for 5 to 10 minutes until slightly thickened. Not as rich, but it works.
Sour cream adds body and a little fat, which helps the cake stay moist and sturdy enough to stack. You can swap full-fat plain Greek yogurt in a pinch. Low-fat dairy works, but the texture will be a bit less plush.
Lemon Curd: Homemade Vs Store-Bought
The filling is where this cake turns from “nice” to “oh wow.” You can absolutely use a good-quality jarred lemon curd if you’re short on time. I usually keep one in the pantry for exactly that reason. Homemade curd is silkier and a bit brighter, though, so I’ll link to a full tutorial if you want to go that route.
Whatever you choose, make sure it is completely chilled before you stack the cake. Warm curd is a sliding disaster waiting to happen.
Frosting: Lemon Cream Cheese Buttercream
The frosting is a hybrid: part classic American buttercream, part tangy cream cheese frosting. Cream cheese balances the sweetness and echoes the lemon curd, while butter keeps it pipeable and sturdy for layering.
Use full-fat block-style cream cheese, not the spreadable tub. Sift your powdered sugar so the frosting turns out smooth and fluffy, not gritty. For flavor, fresh lemon juice plus a pinch of salt is plenty. If you like a stronger pop, add a little zest right into the frosting, but avoid overdoing it or you’ll end up with visible specks in every swipe.
Equipment You’ll Be Happy You Have
You don’t need a professional bakery setup here, just a few tools that make the whole project calmer and cleaner. A couple of them are true game-changers.
First up: cake pans. This recipe is written for three 8-inch round pans, which give you tall, impressive layers. You can also bake it in two 9-inch rounds; the layers will just be a bit thicker and may need an extra minute or two in the oven. Whatever you use, make sure they’re light-colored metal, not glass or dark nonstick, so the edges don’t overbrown before the centers are done.
Line each pan with a parchment circle and lightly grease the sides. I like to trace around the pan onto the parchment while coffee brews, then cut the circles out. Quick little ritual. If you own reusable cake strips, now’s the time to use them for flatter, more even layers.
A stand mixer with the paddle attachment is the easiest way to cream the butter, oil, and sugar until really pale and fluffy. A hand mixer works too; you’ll just need to scrape the bowl more often.
For the lemon work, a microplane zester is your best friend. It removes just the bright yellow zest without the bitter white pith. You’ll also want a small fine-mesh sieve if you’re making homemade curd and want it perfectly smooth.
Two more things that quietly make you look like you know exactly what you’re doing: a kitchen scale and an offset spatula. Weighing the batter so each pan gets the same amount means even layers that stack without wobbling. The offset spatula helps spread frosting and curd right to the edges without digging into the crumb.
Optional but lovely: a rotating cake stand and a piping bag fitted with a large round tip. The stand makes frosting smoother and faster. The piping bag gives you a neat buttercream dam so that lemon curd stays exactly where you want it.
How To Make Lemon Layer Cake (Step-By-Step)
Step 1: Prep The Pans & Ingredients
Set your oven to 350°F (177°C). Grease three 8-inch round pans (or two 9-inch) with baking spray or butter, line the bottoms with parchment circles, then lightly grease the parchment too. This sounds fussy. It’s actually your no-stick insurance policy.
While the oven heats, pull out your butter, eggs, and buttermilk so they’re truly at room temperature. They should feel cool, not cold, and definitely not warm. If you forgot, you can set the eggs in a bowl of lukewarm water for 10 minutes and microwave the buttermilk in 5-second bursts just until the chill is off.
In a medium bowl, whisk together the cake flour, baking powder, baking soda, and salt until everything looks uniform. Set aside.
Step 2: Rub The Zest Into The Sugar
Add the granulated sugar to the bowl of your stand mixer. Sprinkle the fresh lemon zest right on top. Now use clean fingertips to rub the zest into the sugar for a minute or two, pinching and mixing until the sugar feels slightly damp and smells intensely lemony. It should look pale yellow and fragrant.
This little move is where a lot of the “wow, that’s so lemony” comes from. Don’t rush it.
Step 3: Mix The Lemon Cake Batter
Add the softened butter and the oil to the lemon sugar. Beat on medium-high speed for 3 to 5 minutes, stopping once or twice to scrape down the bowl, until the mixture looks very light and fluffy. It should almost look like whipped frosting.
Beat in the vanilla. Then add the eggs one at a time, mixing well after each and scraping the bowl as needed. If it looks slightly curdled at this stage, keep going gently; it will smooth out once the dry ingredients and buttermilk go in.
In a small jug or bowl, whisk together the buttermilk and fresh lemon juice (and a spoonful of sour cream if you’re using it). Now alternate adding the dry mixture and the buttermilk mixture to the batter: dry, wet, dry, wet, dry. Mix on low speed just until each addition disappears. No long mixing at this point. Overmixing = tough cake.
The batter should be thick but pourable, smooth, and lightly speckled with zest.
Step 4: Bake Until Light, Fluffy & Set
Divide the batter evenly among your prepared pans. A kitchen scale helps here so each layer bakes at the same rate. Gently smooth the tops with an offset spatula and tap each pan once or twice on the counter to pop any big air bubbles.
Bake for about 22 to 28 minutes, depending on your oven and pan size. The cakes are done when the edges are lightly golden, the centers spring back when gently pressed, and a toothpick comes out with a few moist crumbs but no wet batter.
Let the cakes cool in their pans for 10 to 15 minutes, then run a knife around the edges, flip onto a wire rack, peel off the parchment, and let them cool completely. Totally cool. Frosting warm cake is a guaranteed slide show.
Step 5: Make The Lemon Cream Cheese Buttercream
Once the layers are cool, beat the cream cheese and butter together on medium speed until smooth and creamy, about 2 minutes. Don’t go overboard here or the cream cheese can loosen too much.
Gradually add the sifted powdered sugar, a cup at a time, mixing on low until combined, then turning up to medium for a few seconds to fluff. Add the vanilla, a pinch of salt, and enough fresh lemon juice to reach a fluffy, spreadable consistency that still holds its shape on a spoon.
Give it a final scrape and whip, then set the frosting aside at cool room temp. If your kitchen is warm, you can chill it for 10 to 15 minutes and rewhip briefly so it’s sturdy enough to pipe a neat dam around your cake layers.
How To Fill, Stack & Decorate With Lemon Curd
Leveling The Layers
Once your cakes are completely cool, it’s stacking time. This is the part that looks intimidating but honestly feels a little like arts and crafts for grown-ups.
If your layers domed in the oven, use a long serrated knife or cake leveler to gently saw off the rounded tops. Keep the knife level and turn the cake, not your hand. You’re aiming for flat, even surfaces so the layers don’t slide. Crumbs everywhere? Totally normal. Just snack on the trimmings while you work.
Place a small dab of frosting in the center of your cake board or serving plate and set the first layer on top. That little bit of frosting glues the cake down so it doesn’t scoot around while you decorate.
The Buttercream Dam (So The Curd Stays Put)
Spoon some frosting into a piping bag fitted with a large round tip (or just snip the end of a zip-top bag). Pipe a thick ring of frosting around the outer edge of the first layer, like a little wall. This is your buttercream dam.
Stir your cold lemon curd to loosen it slightly, then spoon it into the center of the dam. Spread it gently to the frosting border, keeping it level. Don’t overfill; if the curd comes higher than the dam, it will try to escape once you stack everything.
Repeat with the second layer: cake, dam, curd. Top with the final cake layer, bottom-side up for the flattest surface. Press down very gently to settle everything. You’ll see the dam puff out a bit. That’s good.
Crumb Coat, Chill & Final Frost
Now swipe a thin layer of frosting over the entire cake, filling in gaps between layers and sealing in every crumb. This is your crumb coat. It should look a little patchy and imperfect. Think “frosting primer,” not final coat.
Chill the cake for 20 to 30 minutes until the frosting is firm to the touch. This quick trip to the fridge locks everything in place so the lemon curd and crumbs stay obedient while you finish.
Once chilled, add your final layer of frosting, spreading it thicker and smoother. Use an offset spatula or bench scraper to create straight sides and soft swoops on top.
Simple Decorating Ideas (Lemon Slices, Flowers)
For an easy, pretty finish, add thin slices or twists of fresh lemon around the top edge. You can also pile a few in the center. Just pat them dry first so they don’t weep onto the frosting.
Edible flowers like chamomile or small daisies look beautiful tucked between lemons. Or keep it super simple: rustic swirls made with the back of a spoon and a sprinkle of extra lemon zest over the top.
Nothing too fussy. Just bright, cheerful, and clearly lemon.
3 Big Secrets For Perfect Lemon Cake Every Time
If you only remember a few things from this whole post, let it be these. They’re the tiny habits that separate “pretty good” lemon cake from “do not lose this recipe” lemon cake.
Secret 1: Room-Temperature Really Matters
Cold butter doesn’t cream properly. Cold eggs don’t mix in. Cold buttermilk can shock the batter and make it look curdled. All of that can lead to tunneling, weird texture, or random dry pockets.
You want butter that’s soft enough to press a finger in and leave an indent, but not greasy or melting. Eggs and buttermilk should feel cool to the touch, not chilly. I like to set everything out 45 to 60 minutes before baking.
Forgot? Put eggs in a bowl of lukewarm water, and zap the buttermilk in tiny bursts until just slightly cool. Don’t skip this step.
Secret 2: Weigh Your Flour & Don’t Overmix
Too much flour = instant dryness. It’s wild how a “level cup” can swing by 25–30 grams depending on how you scoop. That’s why I gently spoon flour into the cup and level it, or better yet, just use a scale and follow the gram measurements. Reliable every time.
Once the dry ingredients go in, your main job is to be gentle. Mix on low speed and stop as soon as the streaks disappear. Scrape the bowl, give it one last quick turn, and you’re done. Overmixing activates more gluten, which means a tougher, breadier crumb instead of soft and tender.
Secret 3: Simple Syrup & Smart Storage
If you really struggle with dry cakes, a quick lemon simple syrup is like a safety net. Stir equal parts sugar and water with a strip of lemon peel, simmer until the sugar dissolves, then cool. Brush a little over each cooled cake layer before you stack. Not soaked. Just lightly brushed. Instant moisture insurance.
Then store it right. Once the cake is frosted and chilled to set, keep it covered in the fridge because of the cream cheese and lemon curd. Before serving, let slices sit at room temperature for 20 to 30 minutes so the crumb and frosting soften again.
Soft, tangy, moist. Even on day two.
Make-Ahead, Storage & Freezing
Big showstopper cakes feel way less stressful when you know what you can do ahead. This one is super make-ahead friendly, which is honestly half the reason I love it for holidays and birthdays.
3-Day Lemon Cake Game Plan
If you’re baking for a party, here’s the easy schedule:
Day 1: Make the lemon curd and the cake layers. Bake the cakes, cool completely, then wrap each layer tightly in plastic wrap. You can even add a layer of foil if your fridge is crowded. Chill overnight. The curd goes into an airtight jar in the fridge.
Day 2: Mix the lemon cream cheese buttercream and assemble the cake: stack, dam, fill with curd, crumb coat, and frost. Once it’s frosted, chill it uncovered for about 20 to 30 minutes so the frosting firms up, then cover loosely.
Day 3: Decorate with lemon slices or flowers, if you’re using them, and let the cake sit at room temperature for a bit before serving. No last-minute panic. Just slice and enjoy.
You can compress this into one day, of course, but spreading it out makes the whole thing feel like little doable pieces instead of one huge project.
Storing The Finished Cake
Because of the cream cheese frosting and lemon curd, this cake needs to be refrigerated. After it’s fully chilled and the frosting is set, cover it with a cake dome or wrap the whole platter gently in plastic wrap to keep it from drying out or absorbing fridge smells.
The cake will stay moist and delicious for about 3 days in the fridge. Before serving, let it sit at room temperature for 20 to 30 minutes so the butter in the crumb and frosting can soften again. Cold cake tastes muted. Room-temp cake? Bright, soft, and dreamy.
If you’re storing individual slices, press a piece of parchment or plastic against the cut side so it doesn’t dry out. Then tuck them into airtight containers. Little lemon treasure boxes.
Freezing Layers & Frosting
Want to work even further ahead? You can freeze the cake layers and even the frosting.
To freeze layers, cool them completely, then wrap each one tightly in plastic wrap and a layer of foil. Label and freeze for up to 2 months. When you’re ready to use them, thaw in the fridge overnight, still wrapped, then bring to room temperature before stacking and frosting. They’ll taste freshly baked.
The lemon cream cheese buttercream can also be frozen in an airtight container for about a month. Thaw overnight in the fridge, then bring to cool room temp and rewhip on low speed until smooth and fluffy again.
I don’t recommend freezing the fully assembled cake with lemon curd inside, because curd can weep a bit after thawing. Better to freeze the plain layers, then fill and frost closer to serving. Worth the tiny bit of planning.
Lemon Layer Cake Printable Recipe Card

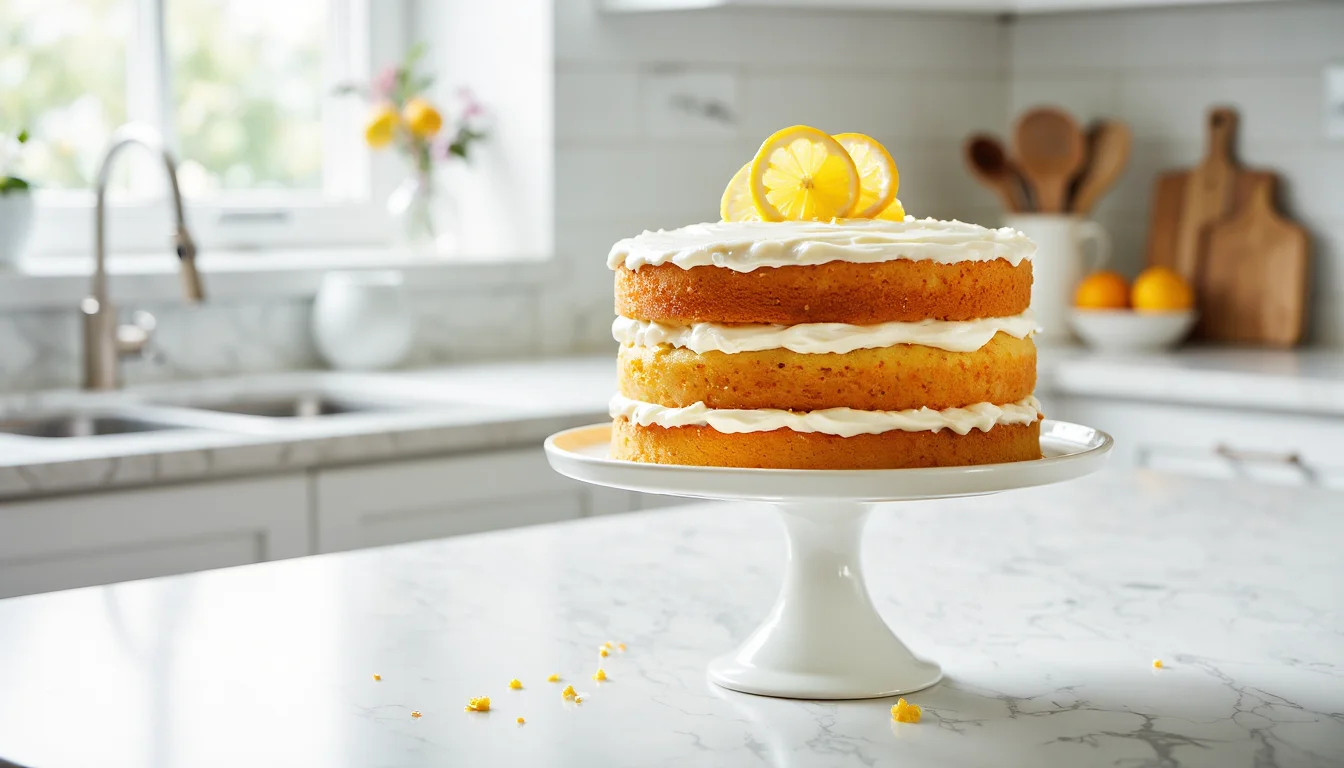
The Best Moist Lemon Layer Cake with Lemon Curd
A soft, bakery-style lemon layer cake with triple lemon flavor: fluffy lemon sponge, tangy lemon curd filling, and lemon cream cheese buttercream. Perfect for birthdays, Easter, or any citrus lover.
Ingredients
For the Lemon Cake Layers:
- 2 3/4 cups (330 g) cake flour, spooned and leveled
- 2 1/2 teaspoons baking powder
- 1/2 teaspoon baking soda
- 3/4 teaspoon fine salt
- 1 1/2 cups (300 g) granulated sugar
- 2 tablespoons fresh lemon zest (from about 2–3 lemons)
- 3/4 cup (170 g) unsalted butter, room temperature
- 1/4 cup (60 ml) neutral oil (such as vegetable or canola)
- 3 large eggs, room temperature
- 2 teaspoons pure vanilla extract
- 1 cup (240 ml) buttermilk, room temperature
- 1/4 cup (60 ml) fresh lemon juice
- 1/4 cup (60 g) sour cream, room temperature
For the Lemon Curd Filling:
- 1 cup lemon curd, well chilled (homemade or good-quality store-bought)
For the Lemon Cream Cheese Buttercream:
- 8 ounces (226 g) full-fat block cream cheese, slightly softened
- 1 cup (226 g) unsalted butter, room temperature
- 4 to 5 cups (480–600 g) powdered sugar, sifted
- 1 to 2 tablespoons fresh lemon juice, to taste
- 1 teaspoon pure vanilla extract
- Pinch of fine salt
For the Optional Lemon Simple Syrup:
- 1/4 cup (60 ml) water
- 1/4 cup (50 g) granulated sugar
- 1 strip lemon peel or 1 teaspoon lemon zest
For Decorating (Optional):
- Thin lemon slices or twists, patted dry
- Extra lemon zest
- Edible flowers (such as chamomile or small daisies)
Instructions
- Preheat the oven to 350°F (177°C). Grease three 8-inch round cake pans (or two 9-inch), line the bottoms with parchment circles, and lightly grease the parchment. Set aside.
- In a medium bowl, whisk together the cake flour, baking powder, baking soda, and salt until well combined. Set this dry mixture aside.
- Add the granulated sugar to the bowl of a stand mixer. Sprinkle the lemon zest over the sugar and use clean fingertips to rub the zest into the sugar until it looks pale yellow, feels slightly damp, and smells very fragrant.
- Add the softened butter and the oil to the lemon sugar. Beat on medium-high speed for 3 to 5 minutes, stopping to scrape the bowl as needed, until the mixture is very light, pale, and fluffy.
- Beat in the vanilla extract. Add the eggs one at a time, mixing well after each addition and scraping down the sides and bottom of the bowl so everything is evenly combined.
- In a small bowl or jug, whisk together the buttermilk, lemon juice, and sour cream until smooth.
- With the mixer on low speed, alternate adding the dry mixture and the buttermilk mixture to the batter: add about one-third of the dry ingredients, then half the buttermilk mixture, another third of the dry, the remaining buttermilk mixture, and finish with the last third of the dry ingredients.
- Mix only until each addition is just incorporated. Stop and scrape the bowl once or twice, then give the batter a final brief mix on low. The batter should be smooth, thick, and lightly speckled with zest. Do not overmix.
- Divide the batter evenly between the prepared pans, using a kitchen scale for accuracy if you have one. Smooth the tops with an offset spatula and gently tap each pan on the counter once or twice to release large air bubbles.
- Bake for 22 to 28 minutes, or until the edges are lightly golden, the centers spring back when gently pressed, and a toothpick inserted in the center comes out with a few moist crumbs but no wet batter.
- Let the cakes cool in the pans for 10 to 15 minutes. Run a thin knife around the edges, then turn the cakes out onto wire racks. Peel off the parchment and let the layers cool completely.
- If using the optional lemon simple syrup, combine the water, sugar, and lemon peel or zest in a small saucepan. Bring just to a simmer, stirring until the sugar dissolves. Remove from heat, cool completely, then discard the peel or strain out the zest.
- When the cake layers are completely cool, level the tops with a long serrated knife if they are domed. Brush the cut sides lightly with the cooled lemon syrup, if using. You want a light coating, not a soaked cake.
- To make the frosting, add the cream cheese and butter to a clean mixing bowl. Beat on medium speed for about 2 minutes until smooth and creamy but not runny.
- Gradually add the sifted powdered sugar, 1 cup at a time, mixing on low speed until incorporated before adding more. Once all the sugar is added, beat briefly on medium until fluffy.
- Add the vanilla, a pinch of salt, and 1 tablespoon of lemon juice. Beat again until smooth. Taste and add a bit more lemon juice if you like a stronger tang, adjusting with a spoonful of extra powdered sugar if needed to keep the frosting thick and spreadable.
- If the frosting feels too soft to pipe, chill it for 10 to 15 minutes, then rewhip on low until it’s smooth, fluffy, and holds peaks on a spoon.
- Place a small dab of frosting in the center of your cake board or serving plate and set the first cake layer on top. This helps anchor the cake while you assemble.
- Transfer some frosting to a piping bag fitted with a large round tip, or use a zip-top bag with the corner snipped off. Pipe a thick ring of frosting around the outer edge of the first layer to create a “dam.”
- Stir the chilled lemon curd until smooth. Spoon some into the center of the frosting dam and gently spread it to the border, keeping it slightly lower than the top of the buttercream wall so it doesn’t spill over.
- Place the second cake layer on top and repeat: pipe a buttercream dam around the edge, fill the center with lemon curd, and spread it level. Top with the third cake layer, bottom side up for the flattest surface.
- Using an offset spatula, spread a thin layer of frosting over the top and sides of the cake to create a crumb coat. This should be just enough to trap any loose crumbs and fill in gaps between the layers.
- Chill the crumb-coated cake for 20 to 30 minutes, or until the frosting is firm to the touch. This helps keep the layers stable and the curd contained while you finish.
- Once chilled, apply a thicker, final coat of frosting over the top and sides of the cake. Smooth the frosting with an offset spatula or bench scraper, or create soft swirls for a rustic look.
- Decorate the top of the cake with thin lemon slices, twists of lemon, extra lemon zest, and edible flowers if you’d like. Pat lemon slices dry before adding so they don’t weep onto the frosting.
- Refrigerate the cake for at least 30 minutes to set the frosting and firm up the layers. Before serving, let the cake sit at room temperature for about 20 to 30 minutes so the crumb and frosting soften for the best texture and flavor.
Notes
- For the best texture, use cake flour and weigh it if possible. Too much flour can make the cake dry, so spoon and level if you’re using cups.
- If you don’t have cake flour, make a quick substitute: for each cup of cake flour, measure 1 cup all-purpose flour, remove 2 tablespoons, and replace them with 2 tablespoons cornstarch, then whisk very well.
- Fresh lemon zest is where most of the lemon flavor comes from. Bottled lemon juice can work in the batter in a pinch, but don’t skip the zest.
- Make-ahead plan: Day 1 bake and cool the layers and make the lemon curd, then chill everything. Day 2 make the frosting, assemble, and frost the cake. Day 3 decorate and serve.
- Because of the cream cheese frosting and lemon curd, the cake should be stored in the refrigerator. Keep it covered and enjoy within about 3 days for the best texture.
- For longer storage, freeze the unfrosted cake layers: wrap each layer tightly in plastic and foil and freeze up to 2 months. Thaw overnight in the fridge, then bring to room temperature before assembling.
- The lemon cream cheese buttercream can be frozen in an airtight container for about 1 month. Thaw in the fridge, bring to cool room temp, and rewhip on low until smooth and fluffy.
- To make a 9x13-inch sheet cake, bake the batter in a greased and lined 9x13 pan for about 30 to 35 minutes, or until the center is set. Spread a thin layer of lemon curd over the cooled cake, then frost with the lemon cream cheese buttercream.
- For cupcakes, fill liners about two-thirds full and bake at 350°F (177°C) for 16 to 20 minutes. Cool completely, core the centers, spoon in a little lemon curd, and frost.
Nutrition Information:
Yield: 14 Serving Size: 1 sliceAmount Per Serving: Calories: 580Total Fat: 28gSaturated Fat: 17gCarbohydrates: 77gSugar: 56gProtein: 7g
Nutrition values are estimates and will vary based on ingredients and brands.
Lemon Layer Cake FAQ
Love This Recipe? Discover More Classic Layer Cake Favorites
If this layer cake hit the spot, don’t miss The Ultimate Guide to Classic Layer Cakes where you’ll find more timeless flavors, smart frosting pairings, and easy fixes for every leaning, crumbly slice.