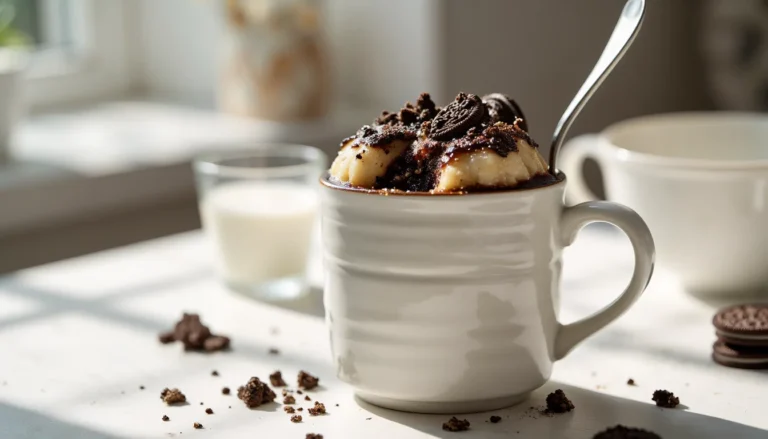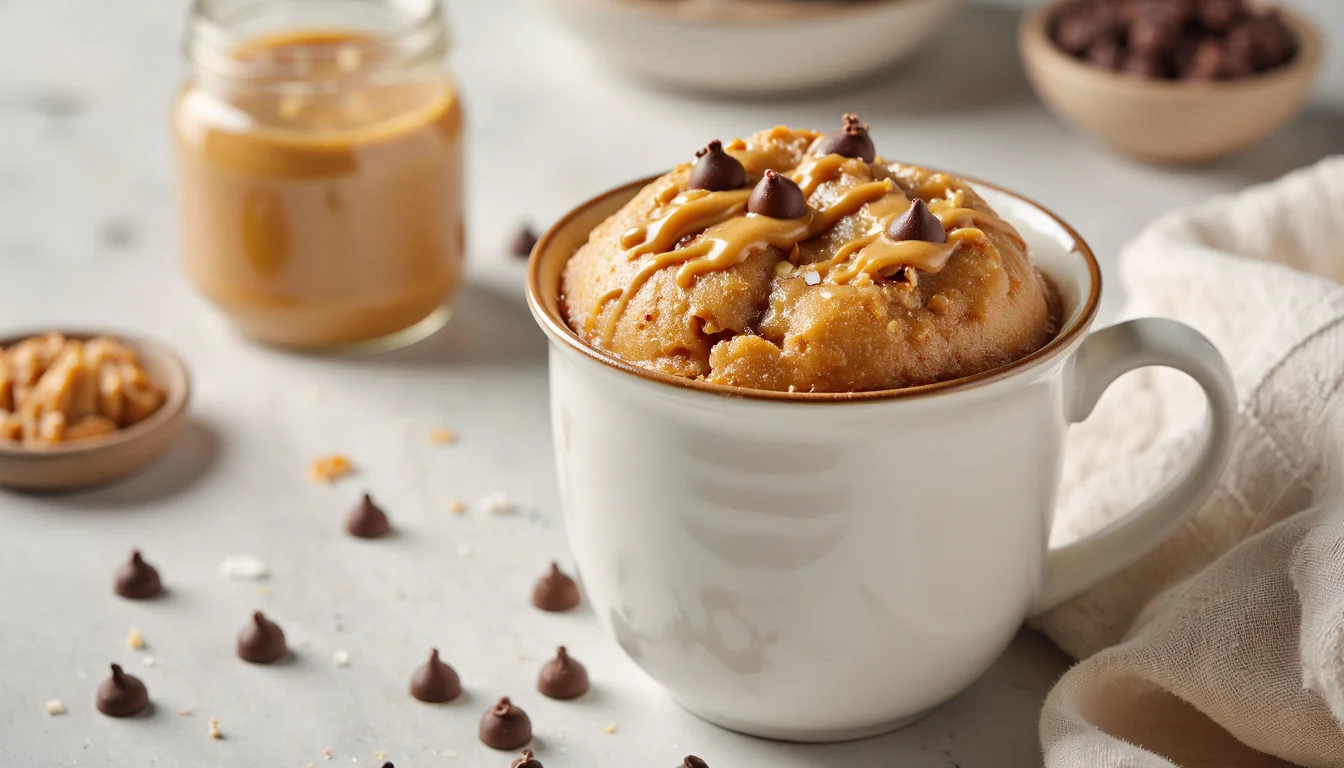
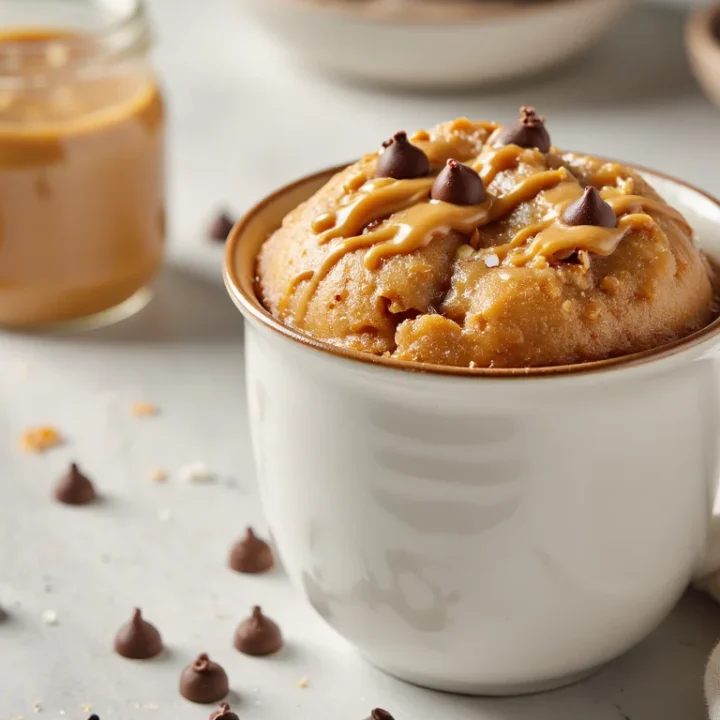
Ultra-Moist Peanut Butter Mug Cake (No Egg)
Why This Is The Best Peanut Butter Mug Cake
You know that moment when the dishes are already done, Netflix is on, and suddenly you need something warm, sweet, and peanut-buttery? That’s exactly when I make this little cake. No mixing bowl. No whisk. Just a spoon and a mug that’s already on the counter.
Most mug cakes taste like a dry sponge or a rubbery scrambled egg in disguise. Hard pass. Here, we skip the egg on purpose so the texture stays soft and fudgy, more like a warm blondie than a cupcake. It still rises, but it doesn’t turn chewy or squeaky when you bite into it.
Everything happens right in the mug. You melt the butter and peanut butter together so they get silky, stir in milk and vanilla, then sprinkle the dry ingredients over the top and fold. Two minutes of effort. Tops.
The ingredients are total pantry regulars: flour, brown sugar, baking powder, milk, a pinch of salt, and your favorite creamy peanut butter. If you bake even once in a while, you probably have all of them already. And if you don’t, the swaps are easy. Oat flour, almond milk, even a vegan version.
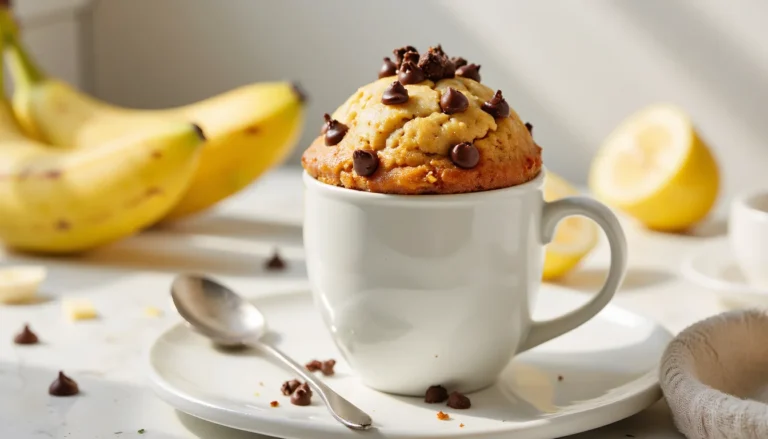
What really sells it for me is the finish. The top looks just set, still a tiny bit glossy, and the inside stays moist with tiny pockets of melted chocolate chips. You eat it straight from the mug while it’s still steaming and cozy. Zero leftovers. Zero temptation sitting on the counter.
And if you’re cooking in a dorm, a small apartment, or after the kids are finally in bed, this is the dessert that actually fits your life. Fast. Comforting. Totally worth washing one mug.
Craving more cozy single-serve desserts? Head over to The Ultimate Guide to Mug Cakes for flavor ideas, timing tricks, and troubleshooting all in one place.
Ingredients & Substitutions
Here’s everything you need for one cozy mug of peanut butter cake heaven. No special trip to the store. Just pantry stuff and a spoon.
Peanut butter
Use a regular creamy peanut butter like Jif or Skippy. These “processed” brands are thicker and more stable, so the cake sets up soft and fudgy instead of greasy. Natural peanut butter with the oil on top can make the texture dense or oily.
Only have natural? Stir it really well, then pack the measuring spoon and expect the cake to be a touch heavier. Still tasty.
Flour
I use 4 tablespoons of all-purpose flour. That’s your main structure. If you want a slightly nuttier, “healthier-ish” vibe, you can swap up to half with oat flour.
Need gluten free? Use a 1:1 gluten-free baking blend, not straight almond flour. Almond flour is too heavy here and will give you paste instead of cake.
Sugar
Brown sugar is my favorite for this recipe. It keeps the crumb moist and adds a tiny caramel note that loves peanut butter. You can use white sugar if that’s what you have, but the texture will be a little lighter and less fudgy.
No granulated sugar at all? Try packed light brown sugar + a teaspoon of maple syrup or honey, but don’t add much more liquid or the cake may not set.
Milk
Any milk works: whole, 2%, almond, oat, soy. I usually grab whatever’s open in the fridge. The important thing is the amount, not the type.
No milk in the house? Use water in a pinch. The cake will be slightly less rich, so a few extra chocolate chips on top help.
Butter or oil
One tablespoon of melted butter gives you flavor and that soft, tender crumb. Vegetable oil or canola oil will make it a bit extra moist and stays softer as it cools. Use whichever you prefer.
Baking powder
Just 1/4 teaspoon. Enough lift so it’s cakey, not pancake batter, without causing the mixture to blow up and overflow the mug. More is not better here.
Salt & vanilla
Tiny pinch of salt + a splash of vanilla keep the sweetness from feeling flat. You don’t really taste them separately. You’d miss them if they were gone though.
Optional mix-ins
- Chocolate chips or chunks
- Mini peanut butter cups
- A swirl of jam for PB&J vibes
- A sprinkle of flaky salt on top after cooking
Pick one or two. Or go completely plain for a simple, soft peanut butter treat.
Step-by-Step: How To Make Peanut Butter Mug Cake
Step 1: Choose The Right Mug
Grab a microwave-safe mug that holds at least 10–12 ounces. Bigger is fine. Anything smaller risks the dreaded lava overflow.
If you’re not sure on size, fill the mug with water, then pour that water into a measuring cup to check. Quick little test.
Step 2: Melt & Mix The Wet Ingredients
Add 2 tablespoons creamy peanut butter and 1 tablespoon butter to the mug.
Microwave for about 15–20 seconds, just until the butter melts and the peanut butter softens. Don’t cook it.
Stir until smooth and glossy.
Whisk in 3 tablespoons milk and about 1/4 teaspoon vanilla with a fork until everything looks like a loose, creamy sauce.
Step 3: Stir In The Dry Ingredients
Sprinkle 4 tablespoons flour, 2 tablespoons packed brown sugar, 1/4 teaspoon baking powder, and a tiny pinch of salt right over the wet mixture.
Using your fork, gently stir until you don’t see any dry flour pockets. That’s it.
Don’t beat it to death. Overmixing builds gluten and gives you a tough, bready texture.
Fold in about 1 tablespoon chocolate chips if you’re using them, saving a few to sprinkle on top.
Step 4: Microwave (Times & Visual Cues)
Place the mug in the center of the microwave.
Cook on HIGH using this guide as a starting point:
- Strong microwave (1000–1200W): about 60–70 seconds
- Lower power (700–900W): about 80–90 seconds
The cake is done when it has risen, the edges look set, and the top is mostly dry but still slightly glossy in the very center. It should not look bone dry.
Skip the toothpick test here. If it comes out totally clean, you’ve probably gone too far.
Step 5: The Crucial 1-Minute Rest
Carefully remove the mug (the handle can be hot) and set it on a heat-safe surface.
Let it sit for 1–2 minutes. No touching. No poking.
During this time, the center finishes cooking and the crumb sets up into that soft, blondie-like texture.
Top with ice cream, whipped cream, or an extra drizzle of warm peanut butter, then dig in straight from the mug. Perfect little solo dessert.
Expert Microwave Tips (So It’s Never Rubbery)
Know Your Wattage
Microwaves are sneaky. My old apartment one could barely melt butter, and our current one turns leftovers into lava in 30 seconds.
If you don’t know your wattage, check the small label inside the door or Google your model number.
Use this as a starting guide:
- 1200W: 45–55 seconds
- 1000W: 55–70 seconds
- 800–900W: 70–85 seconds
- 700W: 80–95 seconds
Always start on the low end. You can add 5–10 second bursts, but you can’t un-cook a dry mug cake.
Mug Size & Shape
A taller, straight-sided mug works best. It gives the cake room to climb without bubbling over.
Aim for at least 10–12 ounces, even though the batter only fills it halfway.
If your mug is really wide and shallow, the cake will cook faster on the edges and stay gooey in the center, so shave 5–10 seconds off the cook time and watch it closely.
Overflow already happened once? Slide a small plate under the mug before microwaving next time. Easy cleanup.
How To Tell When It’s Done
Forget the toothpick. In a mug cake, a perfectly clean toothpick usually means dry.
Instead, look at the top and edges. The sides should look set and slightly pulled away from the mug.
The center should be puffed but still a little glossy and soft. If it looks like raw batter, give it another 5–10 seconds.
Remember it keeps cooking as it rests. So slightly underdone is your friend here.
Why Mug Cakes Get Rubbery
Two big culprits: egg and overcooking.
Egg is powerful protein. In a tiny serving, it can turn bouncy and rubbery really fast. That is why this recipe skips it completely.
The second issue is blasting it in the microwave until it’s bone dry.
So you mix gently, cook in short bursts, and let it rest. Soft, fudgy, not a rubbery sponge in sight.
Variations & 3-Ingredient Peanut Butter Mug Cake
Sometimes you just want to play. Same mug, same craving, slightly different mood. Here are a few fun ways to remix your late-night peanut butter cake without making a whole new recipe.
3-Ingredient Peanut Butter Mug Cake (Flourless Option)
This is the “I have nothing in the pantry” emergency version. It’s denser and more chewy than the main recipe, but it hits that sweet PB craving fast.
In a microwave-safe mug, stir together:
- 2 tablespoons creamy peanut butter
- 1 tablespoon sugar (brown or white)
- 1 small egg yolk OR half a beaten egg (about 1 1/2 tablespoons)
Mix until completely smooth. No streaks of egg.
Microwave on HIGH for about 45–60 seconds, watching closely. The top should look set and puffed.
Let it sit for a minute so it finishes cooking. Then dig in.
Because this one does use egg, the texture is more like a fudgy brownie bite than the soft, cake-y blondie style of the main recipe. It’s naturally flourless and gluten free as long as your peanut butter is.
Chocolate Lover’s Peanut Butter Mug Cake
Make the base recipe as written, then:
- Add 1 teaspoon unsweetened cocoa powder with the dry ingredients.
- Fold in 1–2 tablespoons chocolate chips or chunks.
The cocoa makes it a little richer and more brownie-like. If you add cocoa and your batter feels very thick, splash in an extra teaspoon of milk to loosen it slightly. Top with more chips right before microwaving so they stay visible and melty on top.
PB & J Peanut Butter Mug Cake
This one tastes like a warm, gooey sandwich in dessert form. Kids love it. Adults too.
Prepare the batter in the mug. Once it’s mixed, use the back of a spoon to make a little dent in the center.
Drop in 1–2 teaspoons of your favorite jam or jelly (grape, strawberry, raspberry all work).
Gently spoon a bit of batter over the top to cover the jam.
Microwave as directed.
You’ll get a molten jam pocket in the middle when you scoop down. Careful, it’s hot. Totally worth the tiny surprise.
For a vegan / dairy-free twist on any of these, use plant milk and oil instead of butter, and double-check your chocolate chips and jam are dairy-free. The main no-egg batter is already a great starting point.
Storage, Make-Ahead & Reheating
Honestly, mug cakes are meant to be eaten hot and right away. That first 5–10 minutes is peak cozy, when the center is still soft and the chocolate chips are gooey. If you can, just make it when you want it.
But sometimes life happens. Kid meltdown. Phone call. TikTok spiral. So here’s how to handle leftovers or a tiny bit of planning ahead.
Can You Store Peanut Butter Mug Cake?
Yes, for a short time. Let the cake cool completely in the mug, then cover the top tightly with plastic wrap or transfer it to a small airtight container.
Store in the fridge for up to 1 day. After that, it starts to dry out and lose that soft, fudgy texture.
When you’re ready to eat, reheat gently (details below) and add a splash of milk or a scoop of ice cream to bring back some moisture if it feels a bit firm.
How To Reheat A Mug Cake
For the microwave:
- Place the mug (or cake in a small bowl) in the microwave.
- Heat on 50% power for 10–15 seconds at a time.
- Stop as soon as the top feels warm to the touch.
Don’t blast it on full power for 30 seconds. That’s how you go from “a little dry” to “rubbery hockey puck.” Low and slow wins here.
If you don’t want to use the microwave, you can pop the mug or ramekin into a 300°F oven for about 5–10 minutes, just until warmed through. Cover loosely with foil so it doesn’t dry out too much on top.
Make-Ahead: How Much Can You Prep?
Best option: pre-mix the dry ingredients.
In a small jar or bag, stir together the flour, sugar, baking powder, and salt. Label it “PB mug cake mix” and keep it in the pantry for up to a month.
When a craving hits, you just dump the mix into your mug of melted butter/peanut butter, add milk and vanilla, and you’re basically done.
I don’t recommend mixing the wet batter and letting it sit for hours in the fridge. The baking powder starts working right away, and the flour will soak up the liquid and turn gummy. The result? Flat, dense cake.
If you absolutely must mix the whole batter ahead (maybe you’re sneaking it into the fridge at work), try to cook it within 1–2 hours, and give it a quick stir before microwaving. Not perfect. But workable.
And remember: this recipe is so fast that “make-ahead” usually just means keeping those dry mixes ready so future-you can have cake in under two minutes. Which feels like a gift.
Peanut Butter Mug Cake Printable Recipe Card
Ultra-Moist Peanut Butter Mug Cake (No Egg)
This cozy peanut butter mug cake mixes up right in the mug and cooks in about a minute. No egg, super moist, and perfect for late-night cravings.
Ingredients
- 4 tablespoons all-purpose flour
- 2 tablespoons packed light brown sugar
- 1/4 teaspoon baking powder
- Pinch of fine salt
- 2 tablespoons creamy peanut butter (Jif or Skippy style)
- 1 tablespoon unsalted butter, melted (or neutral oil)
- 3 tablespoons milk (dairy or non-dairy)
- 1/4 teaspoon vanilla extract
- 1 tablespoon chocolate chips, plus extra for topping (optional)
Instructions
- Lightly grease a microwave-safe mug that holds at least 10 to 12 ounces.
- Add the peanut butter and melted butter to the mug. Microwave for 15 to 20 seconds, just until warm and softened, then stir until smooth.
- Whisk in the milk and vanilla with a fork until the mixture looks smooth and creamy.
- Sprinkle the flour, brown sugar, baking powder, and salt over the wet ingredients. Gently stir with the fork just until no dry streaks of flour remain.
- Fold in the chocolate chips, if using, and smooth the top of the batter. Add a few extra chips on top if you like.
- Microwave on HIGH until the cake has risen, the edges look set, and the center is just slightly glossy. Start with 60 to 70 seconds for a 1000W to 1200W microwave or 80 to 90 seconds for a 700W to 900W microwave, adding 5 to 10 second bursts only if needed.
- Carefully remove the mug from the microwave; it will be hot. Let the cake rest for 1 to 2 minutes so it finishes cooking and the crumb sets.
- Top with ice cream, whipped cream, or a drizzle of extra peanut butter if desired, and enjoy straight from the mug.
Notes
- This mug cake is intentionally made without egg so it stays soft and fudgy instead of rubbery or bouncy.
- Use a microwave-safe mug that holds at least 10 to 12 ounces to give the cake room to rise and prevent overflow.
- For best texture, avoid overmixing the batter once you add the flour; stir just until combined.
- If you only have natural peanut butter, stir it very well before measuring and expect a slightly denser texture.
- Any milk works in this recipe, including almond, oat, soy, or regular dairy milk; water can be used in a pinch but will taste less rich.
- To keep it gluten free, use a 1:1 gluten-free baking flour blend in place of the all-purpose flour.
- Skip the toothpick test; a perfectly clean toothpick usually means the mug cake is overcooked and dry.
- The top should look set but still a tiny bit shiny in the center when you stop the microwave, and the cake will continue to cook as it rests.
- For an oven option, bake the batter in a greased 6-ounce ramekin at 350°F for about 15 to 20 minutes, until the edges are set and the center looks just done.
- Microwaves vary, so the first time you make this recipe, watch it closely near the end of the cook time and adjust up or down by a few seconds next time.
- Handle the mug carefully when removing it from the microwave; both the mug and cake will be very hot.
Nutrition Information:
Yield: 1 Serving Size: 1 MugAmount Per Serving: Calories: 560Total Fat: 30gSaturated Fat: 13gCarbohydrates: 60gSugar: 35gProtein: 13g
Nutrition values are estimates and will vary based on ingredients and brands.
Peanut Butter Mug Cake FAQs
Love This Recipe? Discover More Mug Cake Favorites
If this mug cake hit the spot, don’t miss The Ultimate Guide to Mug Cakes. Inside you’ll find small-batch classics, over-the-top flavor combos, and quick fixes for every rubbery or overflowed mug moment. From brownie-style chocolate to bright lemon and gooey cookie dough, there’s a microwave treat for every craving.